

Plastic model kits for beginners: snap-fit or cement, and the tools you need
A plastic model kit arrives as a box of plastic parts attached to plastic frames. You cut the parts off and assemble them yourself 1. Difficulty varies a lot: some boxes can be finished straight out of the box, while others need cement, paint and several specialist tools 2. This article covers the first things a beginner needs to sort out: the difference between snap-fit and cement kits, the minimum tools to buy, how to cut parts off without leaving marks, and how to pick a first kit.
Scale and the usual scales for each subject have their own article, and so do brands and product series. Here, each maker's entry-level line is used only as an example, with no brand recommendation.
Two ways of building
Plastic kits fall roughly into two types. One is snap-fit, where parts clip together with tabs and sockets and no cement is needed. These kits often simplify detail, and the plastic is often molded in the finished color 2. The other is the cement kit, where parts are joined with solvent-type plastic cement 2, and harder ones also need painting.
There is no sharp line between the two. Wikipedia mentions kits where most parts snap together but a few still need glue 2. So check what the box or product page says before buying, instead of asking only "is it snap-fit?"
Here is what each maker's official site says about its entry-level line:
| Brand / line | What the official site says | Tools |
|---|---|---|
| Tamiya Clic Loc | No glue or paint needed; the ABS parts are molded in their final colors 3 | Side cutters are still needed to cut the parts off; the required-tools list names pliers, a modeling knife and tweezers 3 |
| Revell click system | No glue needed and no waiting for glue to dry 4; the filter page lists skill Level 2 - Beginners, age 10+ 4 | Tools not stated on the page |
| Airfix Quickbuild | Pre-colored push-fit parts plus stickers, no glue or paint, can be taken apart and rebuilt, suitable for ages 6 and up 5 | Tools not stated on the page |
| Bandai Entry Grade | Assembly only, no painting or stickers, with a "touch gate" (タッチゲート) design 6 | Parts are designed to be snapped off by hand, no nippers needed 6 |
| Hasegawa Step 1 (ステップ1) | Aimed at beginners, no cement (接着剤) needed 7 | Only hobby nippers are needed 7 |
Snap-fit does not mean tool-free. Tamiya's Clic Loc page says outright that you need pliers to cut the parts off, while Bandai's Entry Grade uses the "touch gate" design, so parts come off without tools 6. Bandai's customer support center explains the term as a kit designed so that parts can be taken off the runner directly, without nippers 8. How Gunpla is handled is left for a later Gundam topic, and this is the only mention here.
The minimum tools to buy
Tamiya's beginner guide says that the sheer range of tools can leave people not knowing where to start, and advises buying the basic ones first and adding more as your methods and skills develop 1. The minimum list for a beginner:
| Tool | What it is for | Source |
|---|---|---|
| Side cutters (nipper, ニッパー) | Cutting parts off the sprue. Tamiya makes a thin-blade type for fine parts and models with a wider range of uses, and each is used for its own job 19. Bandai's page recommends a thin blade when only cutting gates 10 | Official |
| Modeling knife | Cleaning up parts, and also cutting decals and masking tape; replace the blade when it dulls 1 | Official |
| Cutting mat | Tamiya calls it a necessity; it protects the desk from scratches 1 | Official |
| Plastic cement | Only for cement kits. Tamiya's basic one is Tamiya Cement, a bottle with a brush in the cap, and there is also the very runny Extra-Thin Cement, which seeps into the seam between two parts that are already lined up 1112 | Official |
| Tweezers | Holding small parts. Tamiya's Clic Loc page lists tweezers among the required tools 3 | Official, this one page only |
| Sanding stick, sandpaper | Smoothing the nub left after cutting. Bandai's tutorial calls the final trimming with a file and similar tools gate processing (ゲート処理) 10 | Official |
Figure 1 shows a pair of hobby nippers.
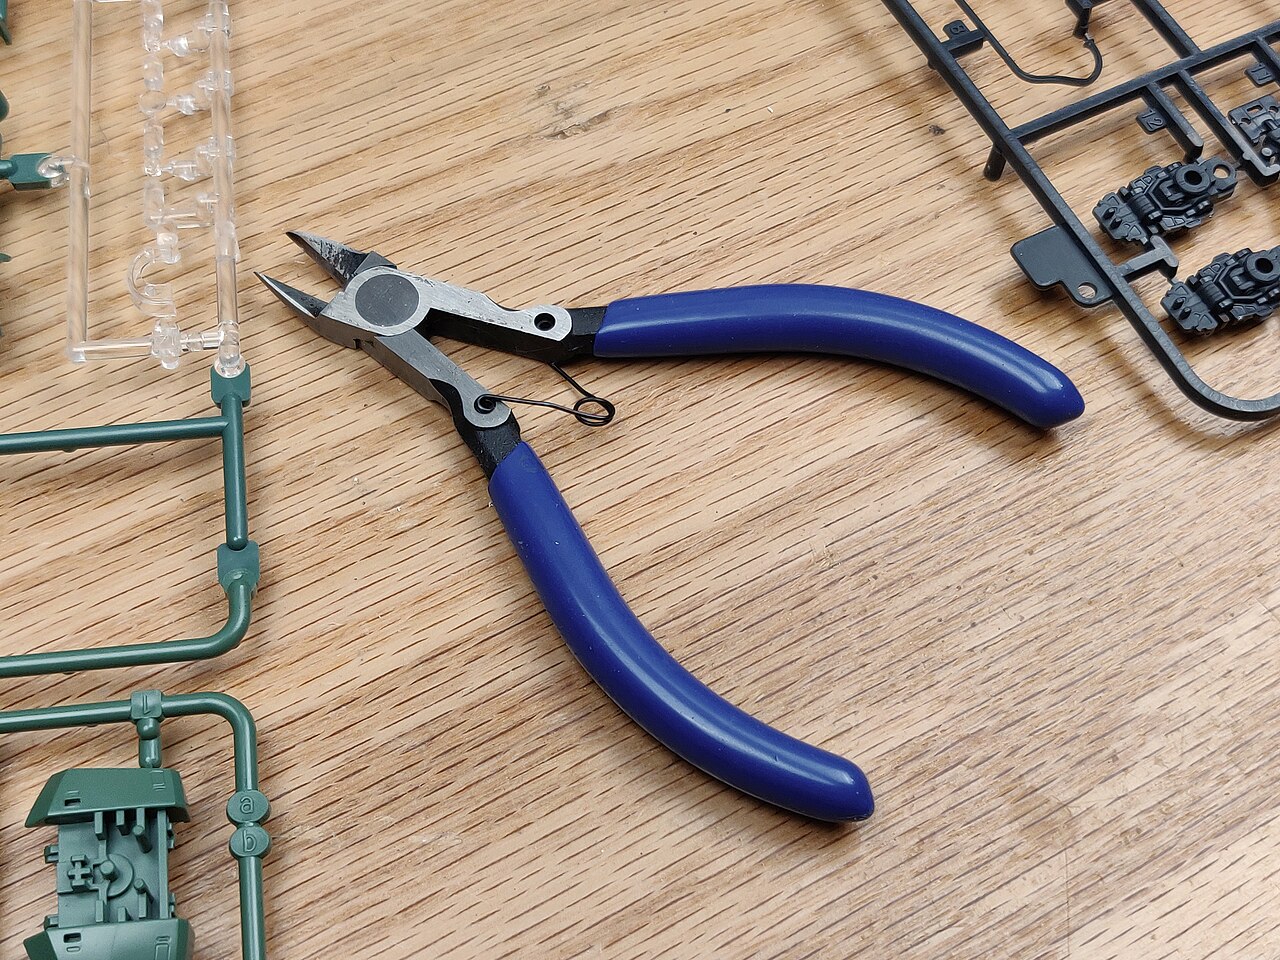
*Figure 1: Hobby nippers and sprues. Photo: Gravis, CC BY-SA 4.0, Wikimedia Commons.*
White glue, super glue and epoxy are other kinds of adhesive, which some people use alongside plastic cement when their properties are needed 2. A beginner can skip paint at first: the parts in snap-fit kits are already in their final colors 3, and for Step 2 Hasegawa also recommends products with colored parts that are easier to assemble 13. Painting is only recommended at Hasegawa's Step 3 page 14.
Sprues, gates and part numbers
Parts grow on a plastic frame called a sprue or runner (ランナー) 19. The short stretch where a part joins the sprue is the gate (ゲート), a word Bandai's tutorial uses when it covers cleanup after cutting 10.
In Figure 2, a dark blue part has been cut off and a small stub is left standing on the sprue. That stub is the gate nub.
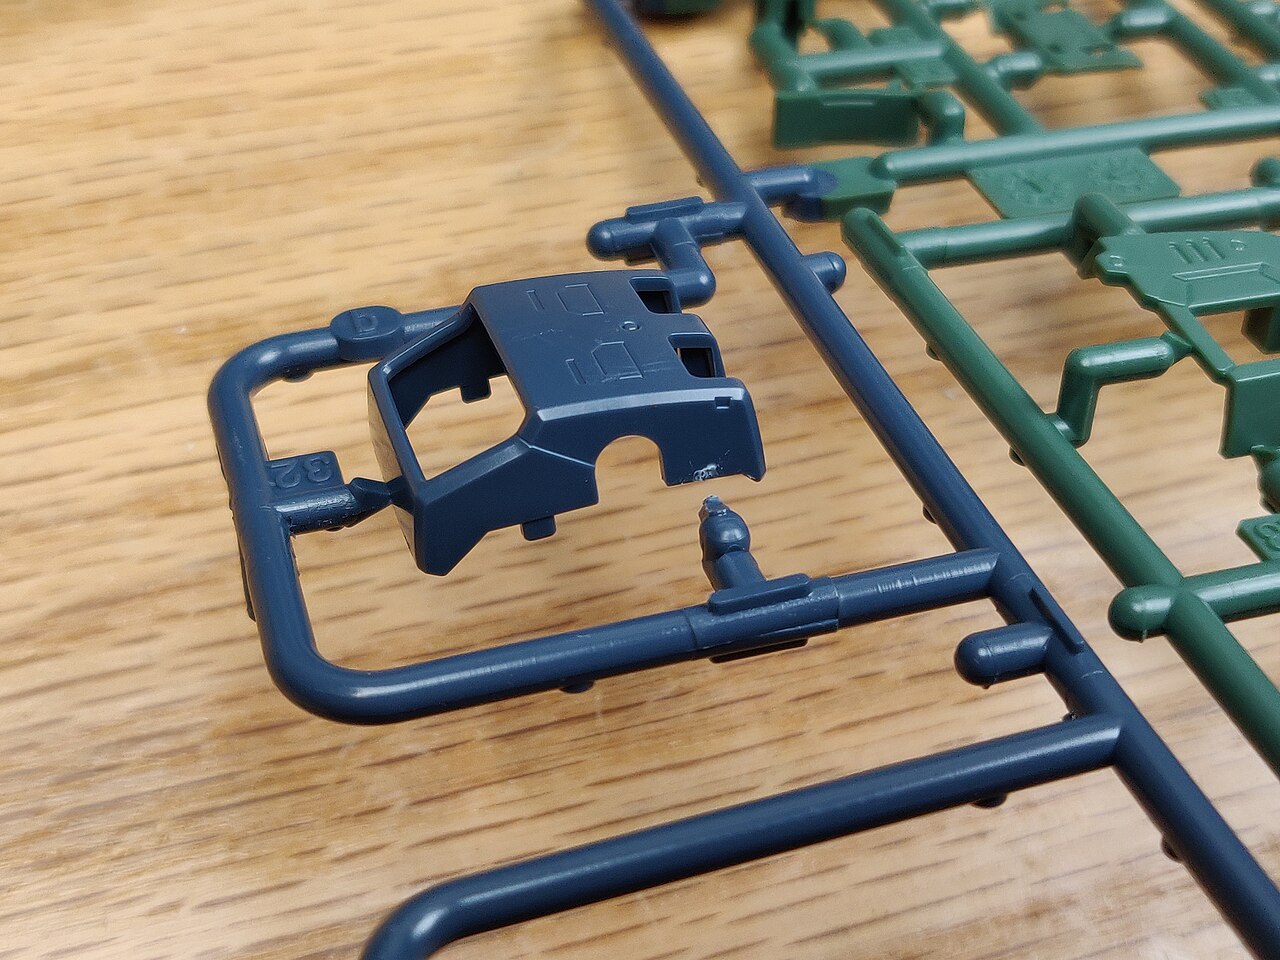
*Figure 2: The gate nub left on the sprue after cutting. Photo: Gravis, CC BY-SA 4.0, Wikimedia Commons.*
How to cut
Hasegawa's official tutorial has five steps: hold the nippers with the flat side toward your palm, find the part by the number in the instructions, cut with the flat of the jaw against the part, clean up the nub left after cutting, and cut from a little further away when the blade will not fit in 15.
Bandai's tutorial recommends two-step cutting (二度切り): leave a little material, make a second cut, then finish with a file or similar. The nippers go in from the back of the sprue 10. Bandai's support center explains why. However sharp the nippers are, the cut surface gets squeezed, and where the pressure concentrates the plastic turns white. Making the first cut a little away from the part and then cutting a second time keeps the whitening to a minimum 16.
For thick sprues, the support center suggests cutting the sprue with ordinary nippers first and then cutting the gates with precision nippers, which makes the precision nippers last longer 17.
As for how much of a nub to leave, the official sources give no figure in millimeters. A retailer's article says to leave 1 to 2 mm and trim it with a knife or sanding stick 18. That is a single secondary source. It follows the same idea as Bandai's two-step cut, so go by feel when using it.
When to cut
The support center advises cutting parts off in batches, section by section as the instructions go, so parts are less likely to get lost and a wrong assembly is noticed earlier 19. Commenters on the same page also mention that small parts and left-right symmetrical joint parts are easy to lose or mix up if cut off early 19.
Instructions
Figure 3 shows two pages of a Revell instruction sheet beside a bottle of plastic cement, a pot of paint and a brush. Figure 4 is the first page of an Airfix T-34 instruction sheet. Both break assembly into small numbered boxes, each drawing the parts for that step, and the number beside each part matches a part in the box. Hasegawa's tutorial also says to read the number in the instructions and find the part with the same number on the sprue 15.
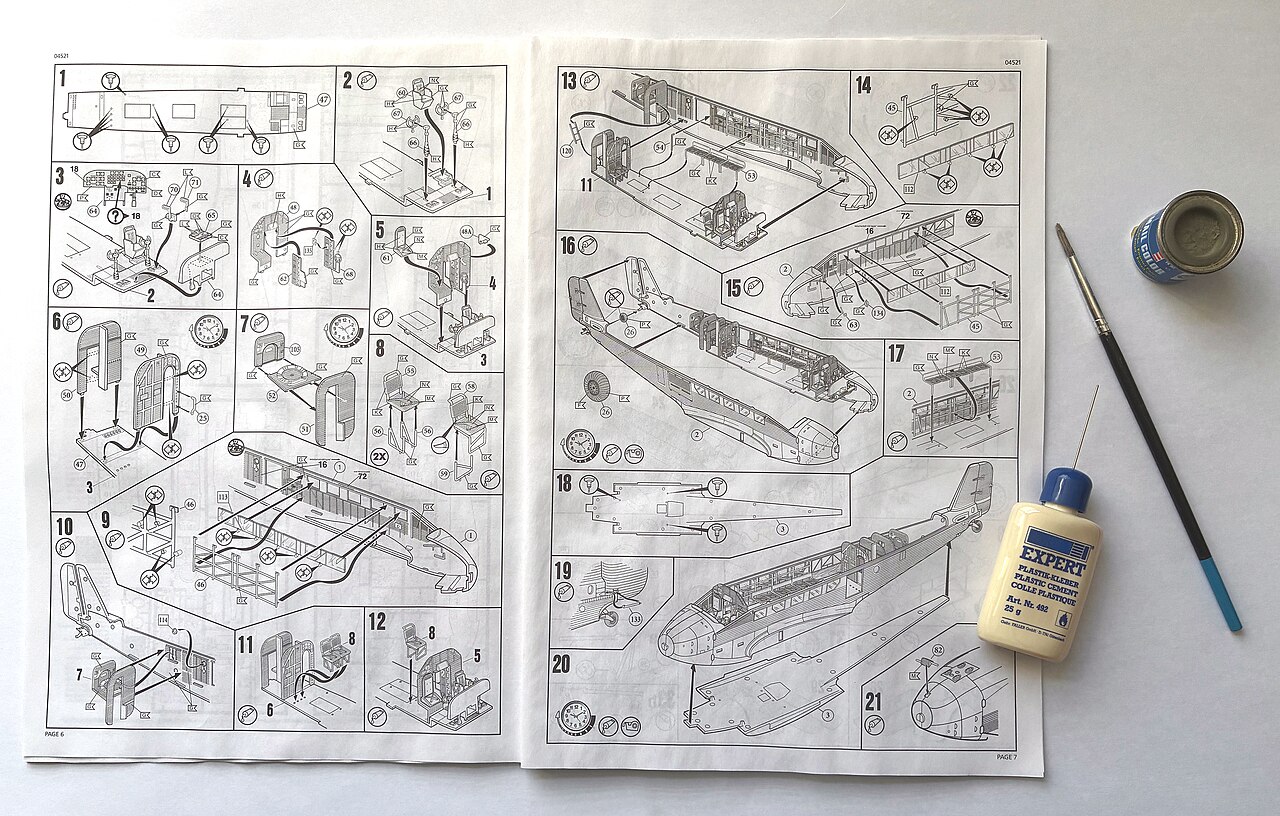
*Figure 3: Instructions, plastic cement, paint and brush. Photo: Auge=mit, CC BY-SA 4.0, Wikimedia Commons.*
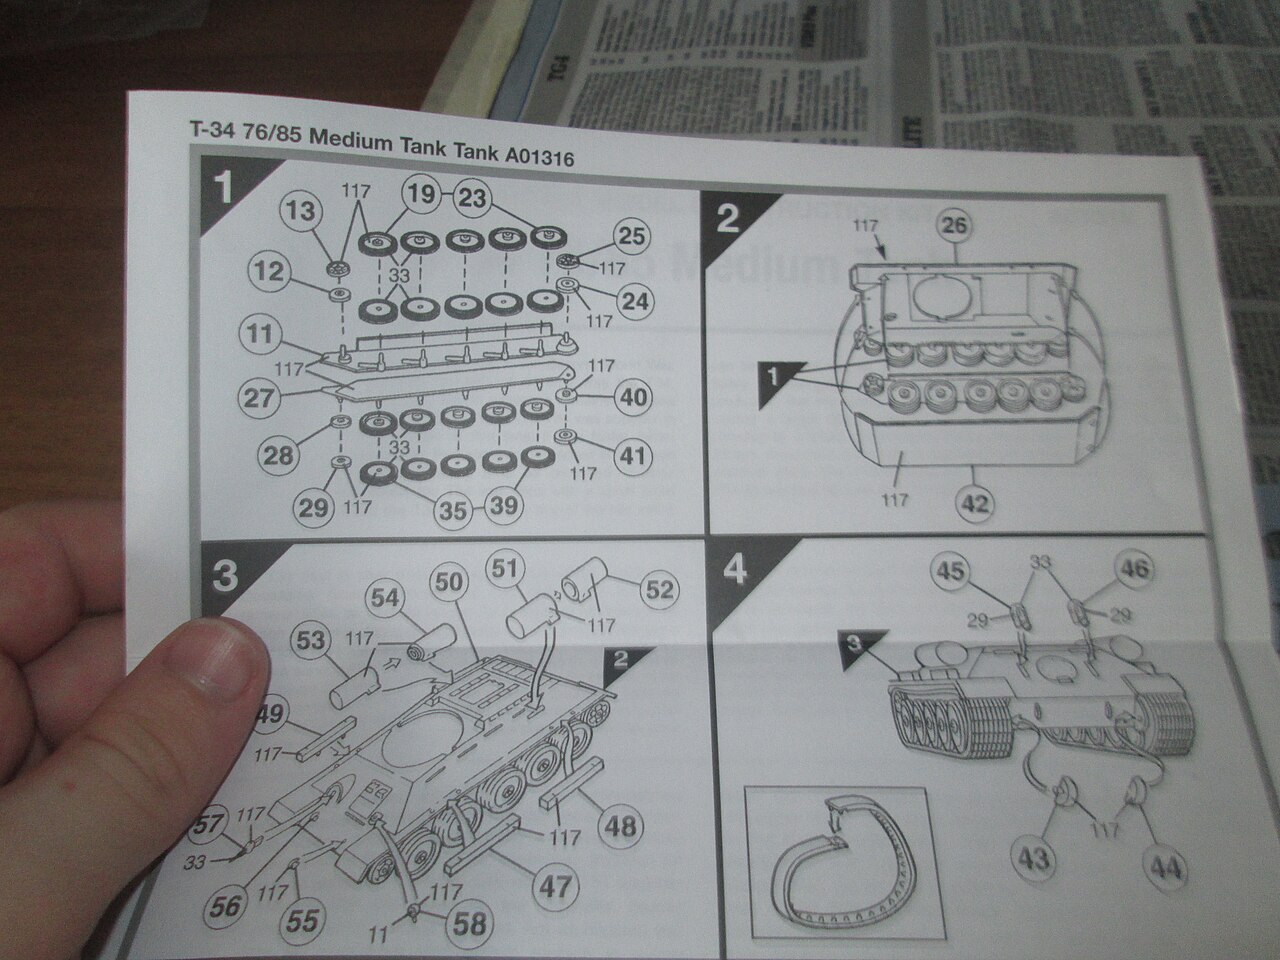
*Figure 4: Airfix T-34 instructions. Photo: TheRustler45, CC BY-SA 4.0, Wikimedia Commons.*
How to read the skill level, scale and paint chart on the box has its own article, "How to read a model kit box and instructions".
Choosing a first kit
First decide which way of building you want.
- If you want no glue and no paint, pick a snap-fit kit. In the table above, the official pages for Clic Loc 3, Quickbuild 5 and Entry Grade 6 say no painting is needed, while Revell's click system page says only that no cement is needed 4, so check the product page for painting. Note that kits that still need nippers (such as Clic Loc) 3 are not the same as kits that do not (such as Entry Grade) 6.
- If you want a traditional cement kit, Hasegawa splits its entry range into three steps: Step 1 is glue-free, Step 2 teaches how to use cement, and Step 3 is full-scale models that are still easy for beginners to build 71314.
On scale, the makers give no single "best for beginners." Within Hasegawa's one entry system, Step 1 holds 1/20 and 1/35, Step 2 has 1/48, 1/72 and 1/200, and Step 3 is 1/450 ships 71314. The scales within entry lines are mixed, so scale does not map directly to difficulty. Revell's difficulty explanation looks at part count and color scheme (see below).
Revell's difficulty levels are a useful reference. Its site advises beginners to choose level 1 or 2. Level 1 is glue-free push-together, level 2 needs basic gluing, and these kits have few parts (usually 20 to 50) and simple color schemes. From level 3 on, careful painting and precise gluing are needed 20. Airfix marks difficulty on the box from 1 to 4, and kits at higher levels usually have more parts 21. Each maker defines its own grading, and the numbers do not necessarily line up, so do not apply one maker's level to another.
To buy everything at once, Airfix's Starter Set includes glue, paint and brushes, while the Classic Kit is the kit alone 21.
Common pitfalls
- Cutting parts with scissors or twisting them off by hand. A retailer's article says many beginners do this, and the results are big nubs, damaged detail and broken thin parts; a video transcript also says not to twist parts off 1822 (secondary sources). Use nippers 1.
- Cutting right at the root of the part in one go. The squeezed cut surface turns white, so leave a little and make a two-step cut 16.
- Cutting off every part in the box at once. Cutting section by section as the instructions go makes lost parts and wrong assembly less likely 19.
- Assuming snap-fit needs no tools at all. Clic Loc still needs nippers 3, and snapping off a touch-gate kit by hand sometimes leaves a ragged break; commenters on the same page suggest using nippers anyway, and scissors or a utility knife will do if you have none 8.
- Too much cement. A retailer article says too much plastic cement can dissolve detail, leave glue marks, or run where it should not 18 (secondary source). Bottled cement with a brush is easier to control than tube glue, which is a personal opinion in the video transcript and is also secondary 22.
- Cutting parts without washing the sprues. The same retailer article suggests washing the whole sprue in warm water with mild dish soap first 18 (secondary source).
- Difficulty varies a lot even within one brand. Check the skill level and part count before buying instead of trusting the brand alone 2220.
- Rushing. The video transcript lists rushing as one of the beginner mistakes 22 (secondary source).
Related terms
Sources
Numbers match the [n] in the text. All accessed on 2026-10-13.
- Tamiya: Plastic Modeling - A Basic Guide
- Wikipedia: Plastic model kit
- Tamiya: 1/24 Volkswagen Type 2 Clic Loc (28101)
- Revell: click system
- Airfix: Quickbuild
- Bandai Hobby: ENTRY GRADE RX-78-2 Gundam
- Hasegawa: ステップ1 (Step 1, for beginners; Japanese)
- Bandai Hobby Site, Support Center: ガンプラのタッチゲートって? (What is Gunpla's touch gate?; Japanese)
- Tamiya: プラモデルの基本道具 (Basic tools for plastic models; Japanese)
- Bandai Hobby Site: 作ろう!ガンプラ (ゲート処理) (Let's build Gunpla, gate processing; Japanese)
- Tamiya: Tamiya Cement 40ml (87003)
- Tamiya: Tamiya Extra-Thin Cement 40ml (87038)
- Hasegawa: ステップ2 (Step 2; Japanese)
- Hasegawa: ステップ3 (Step 3; Japanese)
- Hasegawa: パーツを切り出す(ニッパーの使い方) (Cutting out parts, how to use nippers; Japanese)
- Bandai Hobby Site, Support Center: ゲート処理について (About gate processing; Japanese)
- Bandai Hobby Site, Support Center: 色々なニッパー (Various nippers; Japanese)
- Pro Scale Hobbies: 10 Common Model Kit Assembly Mistakes
- Bandai Hobby Site, Support Center: 部品をランナーから外すタイミング (When to remove parts from the runner; Japanese)
- Revell: Starter Kit R.M.S. Titanic (includes the skill level explanation)
- Airfix: What's on the box
- Hobby Shop HQ: New to scale modeling? Avoid these five beginner mistakes (video transcript)
Updated 2026-10-13