

Building your first complete layout: from one loop of track to a small scene
A layout is a board with track, power and scenery on it. Japanese calls it レイアウト, and the Chinese version of this site calls it 沙盘. This article defines a "first complete layout" as a loop of track that runs reliably, plus a pair of turnouts and a spur, on a flat board with dependable power and a little simple terrain and a few buildings. That definition is the editors', not an industry standard.
The sections follow the order you will meet the decisions: buy a set or assemble your own, how big the board should be, how tight a curve can be, which track system to pick, how to wire it, how to lay out the first loop and extend it, where to start with scenery, roughly what it costs, and where things most often go wrong. Starter sets and track systems differ between Europe, the US and Japan, and all three are covered. For the basics of scale, power system and brands, read Scales and gauges, AC or DC, analog or DCC and Model train brands first. They are not repeated here.
Expect an oval first
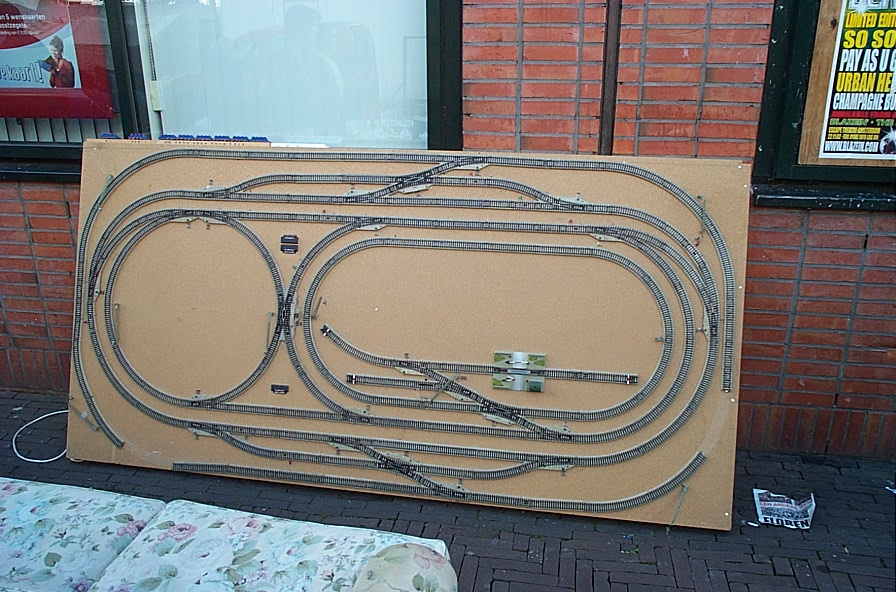
The National Model Railroad Association (NMRA) beginner's guide recalls how most people start: the first layout was probably an oval of sectional track on the floor or a sheet of plywood. Later came a crossing to make a figure 8, then a turnout to make a spur, then a passing siding so one train could wait while another went by 2. The same guide advises starting small and being willing to rip up your first plan, because mistakes are expected 1.
So there is no need to design a big layout on day one. Get one oval running reliably, then add one thing at a time, so that each step can be checked against the last.
Starter set or assemble your own
A starter set usually contains one or two locomotives, a few cars, an oval of track, a controller and a power supply. The table below shows several representative sets. Prices are the list prices on the maker's or a retailer's page, and prices in different currencies cannot be compared directly.
| Set | List price | Power | What is in the box | Oval footprint |
|---|---|---|---|---|
| Piko myTrain 57090 | €69.00 | Analog DC | 1 diesel locomotive, 3 freight cars, 12 R2 curves, 2 straights 25 | About 110 × 88 cm, minimum assembly area 120 × 98 cm 25 |
| Piko 57154 (roadbed track) | €134.99 | Analog DC | BR 218 diesel, 3 freight cars, 12 curves, 5 straights 26 | About 158 × 88 cm, minimum assembly area 168 × 98 cm 26 |
| Märklin 29133 Start up | €129.99 | Digital | Diesel locomotive, cars, Power Control Stick controller 22 | 112 × 76 cm 22 |
| Märklin 29479 Regional-Express | €399.00 | Digital (mfx) | Diesel locomotive, 2 double-deck coaches, C-track, one pair of manual turnouts, Mobile Station controller 23 | Not stated on the official page 23 |
| Roco 5100017 | €169.90 (retailer pre-order price) | Analog DC | BR 218, 2 coaches, handheld controller, oval with roadbed 27 | About 175 × 100 cm 27 |
| Bachmann Thoroughbred 00691 | $209.00 | DC | F7 diesel, 3 freight cars, E-Z Track oval, power pack and speed controller 28 | 47 × 38 in (about 119 × 97 cm, editor's conversion) 28 |
| Hornby R1270M Valley Drifter | £99.99 (pre-order) | DC | Small steam locomotive, 1 coach, 1 wagon, R1 oval, controller 33 | 1600 × 1180 mm baseboard mat 33 |
| KATO M1 エンドレス線路基本セット | ¥11,000 | DC | Track, feeder wiring, rerailer, power pack; the page lists no rolling stock 4445 | 1337 × 677 mm 44 |
| TOMIX 90185 (EF66 + 24 series) | ¥25,300 (tax included) | DC | Locomotive, coaches, track, N-600 controller 55 | Not stated on the official page |
Hornby is British OO (1:76), not HO. It is included because it is the most common starter set in Britain 33. The Märklin, Piko, Roco and Bachmann prices come from official shops or retailer pages, and KATO's from its own website. Roco's official site returned 403 to the editors' fetch, so the Roco data comes from a German retailer 27. Prices change, so go by the fetch dates (see source 43).
Atlas's True-Track starter set #0488 contains only track and turnouts. The page says "Trains and power pack sold separately" 34. KATO's M1 follows the same idea: buy the track and controller first, and the train separately 45.
What a set gives you and what it limits
The NMRA beginner's guide does not compare sets with buying parts separately. The only account the editors found comes from the blog of a US model retailer, so it is a seller's view and should be read as such. It says the good side is that you open the box, join the track and run within an hour. The limits are that the parts are usually cheaper, the locomotive has less detail, the plastic wheels on the cars gather dirt easily, and the set's power supply struggles with more than one train 40. The blog's specific price gaps and percentages have no clear source and contradict each other, so they are not used here.
A better-supported fact matters more than any of that. Most sets today use sectional track with a plastic roadbed 4, and roadbed track from different makers mostly does not connect, because each maker has its own clip design. The grey plastic hooks on Bachmann E-Z Track roadbed are one example 4. So buying a set also means choosing a track system, and every later turnout and extra piece of track has to come from the same system.
(Editor's advice) Treat the set as your first oval. The layout proper starts when you add turnouts and a passing siding. Before buying, check that the maker sells turnouts and extension packs, because if it does not, the track cannot grow. Whether a used set or buying pieces separately is cheaper, the editors found no reliable source, so no conclusion is drawn here.
How big the board should be
What others use
The NMRA recommends a 4 × 8 ft board (about 122 × 244 cm) for HO and N to start with, or an 8 × 2 ft module 1. 4 × 8 ft is the size of a standard sheet of plywood, which is the main reason it is popular, and the same article warns that most people soon find it too small 10. Model Railroader magazine says the 4 × 8 has stood the test of time: one sheet holds enough track and wide enough curves, and filling its 32 square feet is an achievable goal 57.
European reference points: Märklin's magazine series for beginners has a 200 × 90 cm small H0 layout in C-track, with a frame that takes 3 to 4 hours to build 14. Another issue of the same magazine says 220 × 120 cm is close to the smallest H0 size, and anything smaller usually means big compromises, so beginners should start small 13. Märklin's official Gleisplanbuch collects 25 C-track plans. The smallest are 110 × 150 cm, 110 × 190 cm and 120 × 200 cm, and the two figure-8 plans are 125 × 325 cm and 130 × 335 cm 16. A figure 8 clearly takes much more room than an oval of similar complexity.
In Japan, an N-scale loop is smaller still. KATO's M1 set measures 1337 × 677 mm when assembled, and the M2 (which adds a siding) is 2019 × 751 mm 44. In KATO's official plans, one 畳 (a tatami mat, about 1800 × 900 mm) holds a double-track loop with two stations 48.
How much room one oval takes
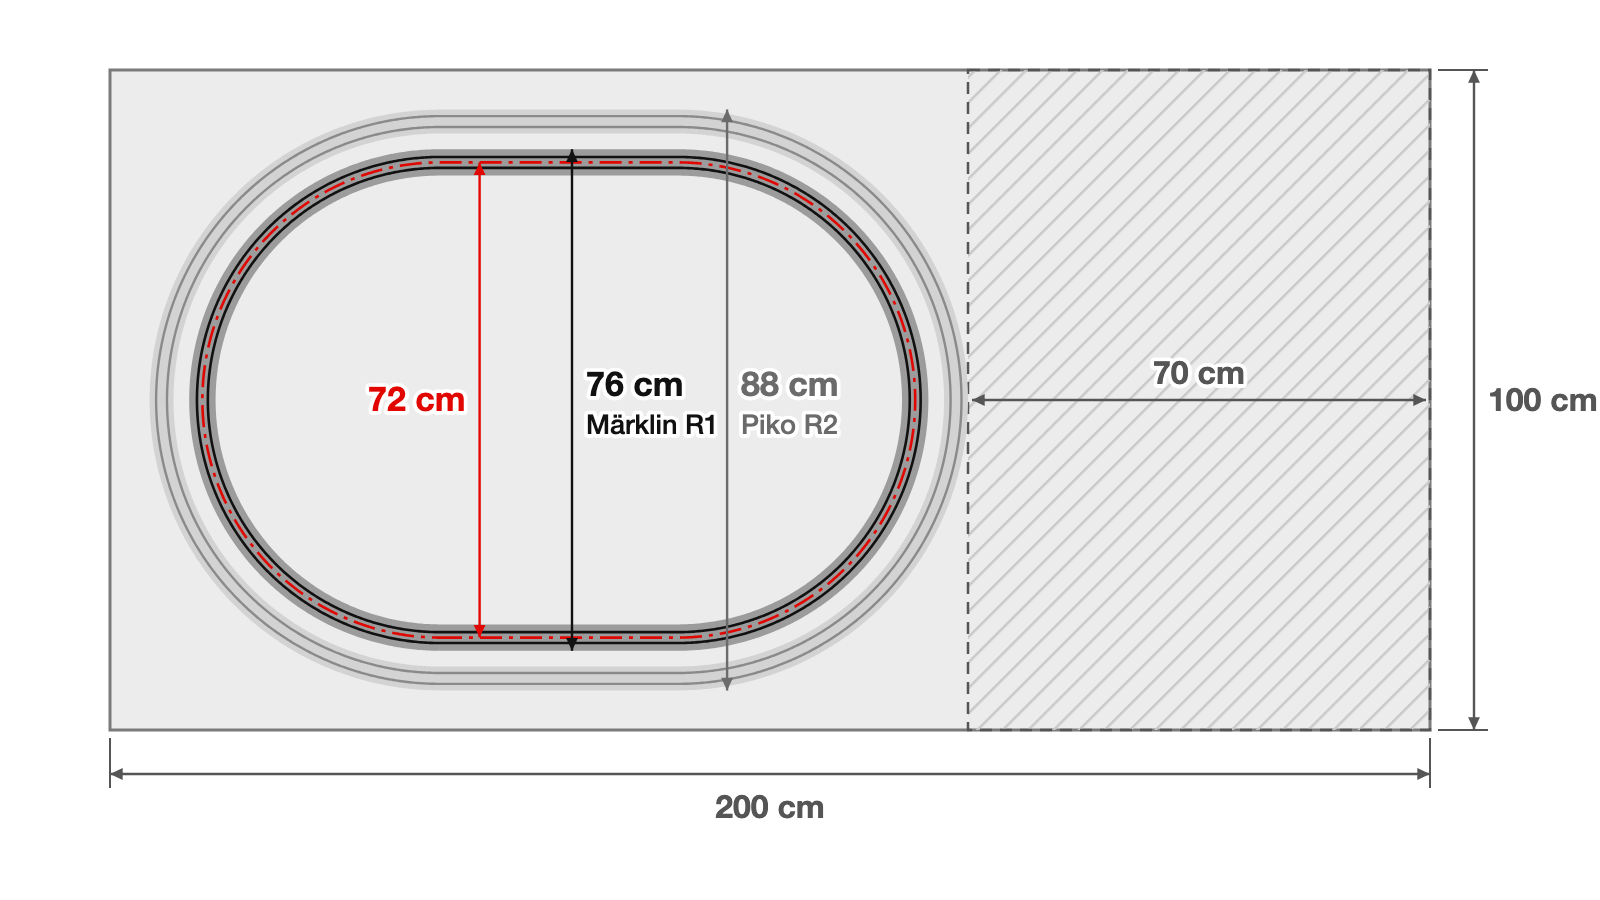
Scales and gauges estimated that the smallest HO loop is about 72 cm wide, and that is the diameter of the curve's centre line. Real track has width. Märklin's base circle has a radius of 360 mm, with 12 curved pieces to a circle, and the outside diameter of the track measures 76 cm 12. Piko's starter sets use the larger R2 curve and occupy 88 cm of width 24. So do not cut the board to 72 cm.
(Editor's advice) Leave about 2 m × 1 m for a first board. That fits an oval plus a passing siding. Piko's A, B and C track sets together measure 182 × 88 cm 24, which agrees with the "1 m × 2 m" in the previous article. If you only have a table, Japanese N scale or other makers' N and Z scale are a better fit.
Building the board
The simplest way is a wooden frame covered with a sheet of plywood, with a leg at each corner 3. The NMRA's open-grid frame uses 1 × 4 in (25 × 102 mm) lumber with cross braces roughly every 16 to 24 in, joined with screws rather than nails 3. Pick straight boards, and avoid cheap ones with rounded edges, which are often not straight 3. The top must be level, so use a spirit level when fitting the legs 3.
How thick the top needs to be depends on how closely it is supported. The sources give different numbers, but the principle is the same: the closer the supports, the thinner the top can be.
| Source | Top | Support |
|---|---|---|
| NMRA beginner's guide | Plywood 5/8 to 3/4 in (15.9 to 19 mm) | Cross braces about every 16 to 24 in 3 |
| Märklin magazine | Blockboard or poplar plywood, 10 to 12 mm | A base frame under the top, plus two or more cross braces 13 |
| NMRA beginner's guide | Pink or blue extruded foam, 2 in (50 mm) | Many people add a 1/4 in plywood layer underneath, glued with foam-safe adhesive 3 |
Märklin's magazine says the base frame stops the top from sagging, and sagging causes trouble at the track joints 13. The NMRA points out one more use for thin plywood: when you mount wiring and turnout controls underneath, small wood screws can bite into it 3.
On height, the NMRA says 38 to 52 in (about 97 to 132 cm) is comfortable for most people 3. Märklin's magazine recommends 80 to 100 cm for operating and playing, and suggests using a kitchen counter as a guide 13. The two numbers are aimed at different people (the first at an adult standing to operate, the second at a family series where everyone plays together), so choose by your own height and how you will use the layout.
The NMRA also notes that an oval laid temporarily on a carpet usually does not run well 1.
Before building, Märklin's magazine suggests drawing the track, streets and buildings on the board in pencil at full size, like a life-size floor plan, because the position of the streets affects where the track goes 13. The NMRA also warns that ideas on a sketch usually take up much more room in reality than you expect 2.
How tight a curve can be
Why radius is the first number to fix
Curve radius decides how much room a loop takes and which trains can run on it. Märklin's magazine calls the 360 mm R1 "the best balance between minimum space and closeness to the real thing", and says all models are normally designed to take R1. With anything tighter, long express coaches and large locomotives start to have trouble, like a tractor-trailer trying to take a very tight 90-degree turn 12.
The NMRA gives a rule of thumb: the longest train that will run reliably is about three quarters of the circumference of the circle drawn by your minimum radius. For a 27 in minimum radius, that means a train up to 10 ft long 2. It is a rule of thumb with no standard behind it. Applied to R1 at 360 mm, the circumference is about 2.26 m and three quarters is about 1.7 m, roughly six 25 cm coaches (editor's estimate). The NMRA also says that 20th-century passenger cars are so long that they swing out on small-radius curves, which looks poor and runs poorly 2.
Each maker's radii
Two makers can both say "R1" and "R2" and mean different numbers, so name the system, for example "Märklin's R2":
| System | R1 | R2 | Notes |
|---|---|---|---|
| Märklin C-track | 360 mm | 437.5 mm | R1 makes a circle of 76 cm outside diameter; R1 and R2 are 77.5 mm apart, so a double-track oval fits a 1 m wide board 12 |
| Piko A-track | 360 mm | 421.88 mm | Four base radii, 61.88 mm between adjacent rings 24 |
| Bachmann E-Z Track | 18 in (about 457 mm, editor's conversion) | 22 in (about 559 mm, editor's conversion) | 18 in is the base curve, 22 in is for wider curves and suits longer rolling stock 3031 |
Piko's flex track can be bent tighter than R1, but below 358 mm larger rolling stock may derail. If you really need a smaller radius, the maker advises trying your own trains first and fixing the track only when they run well 24.
Standards give lower limits. The NMRA's RP-11 lists HO minimum radii by category, from 14 in (356 mm) up to 44 in (1118 mm). It says that some models, especially entry-level ones, can take tighter curves, while finely detailed brass models may need wider ones, and it advises using the largest radius your layout allows 7. The European NEM 111 writes minimum radius as a multiple of the gauge: 21.5 times for short vehicles (HO gauge is 16.5 mm, so about 355 mm, editor's conversion) and 25 or 30 times for longer ones (about 413 mm or 495 mm, editor's conversion). It says to use these limits only when there is no alternative and otherwise to choose the larger radius 9. Märklin's and Piko's R1 sits right at the short-vehicle limit. It is a compact loop made for entry-level models, and not every HO train will run on it with confidence.
Japanese N scale works the same way. KATO makes R315 (radius 315 mm) its basic curve, with 8 pieces to a circle, and nearly all trains can pass it. R282 suits most conventional-line (在来線) trains, and there is also R249 46. KATO's M1 set uses R315, and the official reason is that Shinkansen trains can pass it 45. TOMIX's Fine Track is based on a 280 mm radius 52. KATO's Unitrack Compact has tighter curves such as R150 that only small trains can use. KATO asks you to check the minimum radius in the train's manual first, and if it is not given, R249 is the minimum 49.
(Editor's advice) Check a train's minimum radius before you buy it, so you do not find out that it will not fit your first loop.
Which track to use
The NMRA divides beginner track into three kinds: sectional track (also called set track), sectional track with built-in roadbed, and flex track 4.
| Type | Advantage | Cost |
|---|---|---|
| Sectional track with roadbed | Looks more like the real thing, joins more firmly, and reduces misalignment and poor contact 4. Bachmann E-Z Track is a clip-together track and roadbed design 32 | Different makers mostly do not connect 4 |
| Traditional sectional track | Fixed shapes, so you can assemble a ready-made plan 4 | Designing a closed loop more complex than a simple oval takes geometry and is easy to get wrong 4 |
| Flex track | Any radius, easing curves possible, fewer joints 4 | You cut and file the rail yourself, and must not bend it tighter than your planned minimum radius 4 |
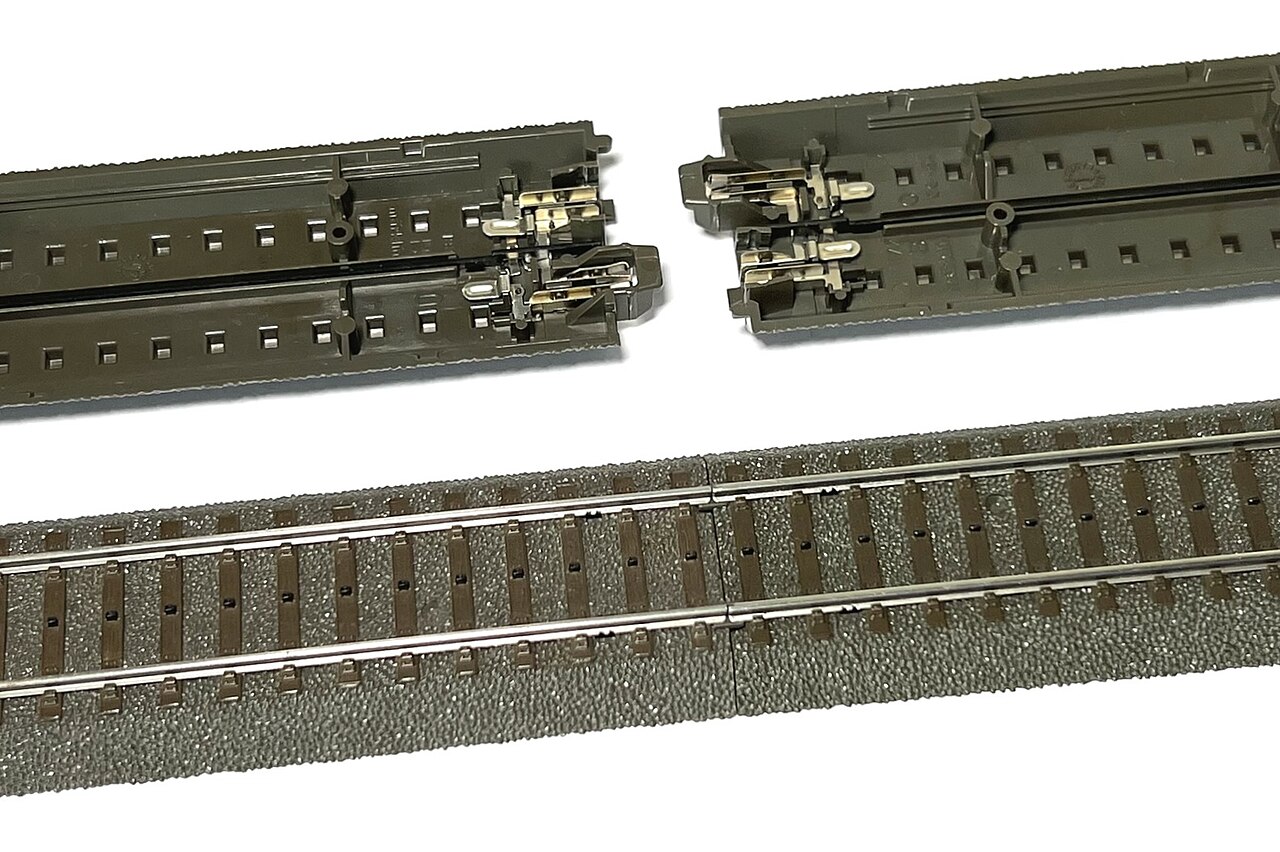
The NMRA says that for the past twenty years sectional track with plastic roadbed has replaced traditional sectional track as the standard in most sets 4. It has two layers of connection, the clips on the roadbed and the metal rail joiners, so it is easy for a rail to sit on top of a joiner without going into it 4. Once a joint loosens, the rails slowly drift out of line and cause derailments, and the current cuts in and out 4. Bachmann's instructions call joining the rails the most important step of assembly. They want every joint tight and flat, and say to check by running a finger lightly over the railhead 32.
On rail material, the NMRA is clear: choose only nickel silver. Brass and steel oxides conduct poorly and the track needs frequent cleaning, while nickel silver oxide conducts better 4.
On turnouts (called switches in American English and Weichen in German): in sectional-track sets, the diverging side of a turnout curves all the way and does not run straight in and straight out 4. Turnouts are manual by default. Märklin's C-track turnout 24611 comes with a hand lever and can have a motor and decoder added later 20, and the magazine says a standard turnout is always a manual one to begin with 12. KATO's M2 set comes with a motorised turnout and the ポイントスイッチ (turnout switch) for it 45, and in KATO's system, switching a motorised turnout needs the ポイントスイッチ, connected to the terminals on the right of the パワーパック (power pack) 47. TOMIX's official introductory page does not explain how to wire turnouts, and its starter set does not include one 53. For that, read the product manual.
Two-rail turnouts give you one more choice. On Peco's Insulfrog turnouts the frog is dead, which keeps wiring simple, but a locomotive with a short wheelbase, few pickup wheels or no flywheel may stall on the frog at slow speed. On Electrofrog turnouts the frog is live and switches with the turnout, so stalling is less likely, but the wiring needs care 37. An NMRA technical note also says the frog must be insulated from the rails ahead of it 8. This only matters if you use Peco or other two-rail turnouts.
(Editor's advice) For a first layout, choose a track with roadbed, and before you buy, check that the system has turnouts and extension packs. Learn flex track later if you want free-form shapes.
Wiring
How sets connect
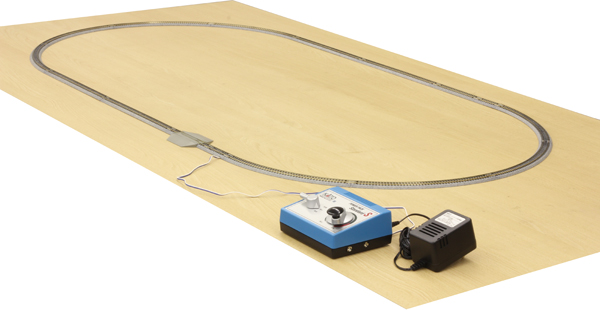
Wiring in sets is simple, but each maker does it differently:
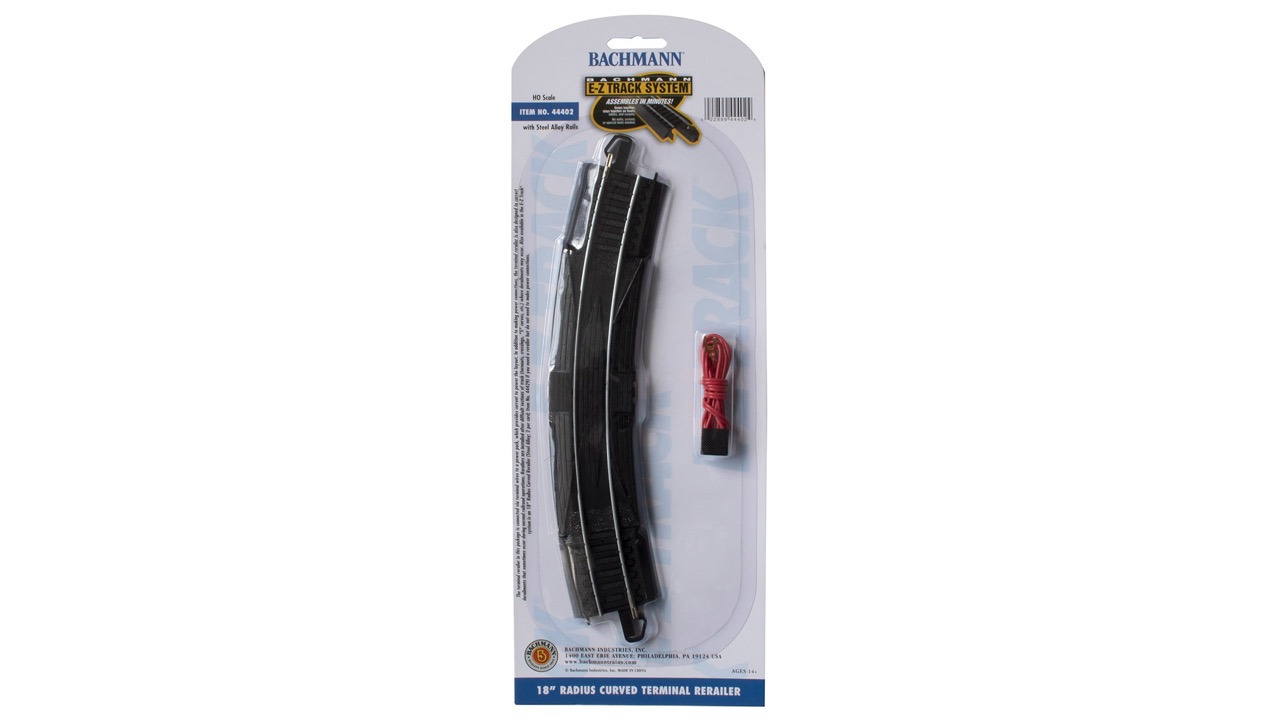
- Bachmann: the power pack's wires plug into the terminal rerailer track, and locomotives and cars are put back on the rails from that piece 32.
- Märklin C-track: almost any piece can act as a feeder piece. There are contacts under the end of the piece for a special connector, with the red wire to the centre contact and the brown wire to the rails 17. There is also a dedicated feeder piece, 24088, that connects a transformer and up to 2 Mobile Stations 21.
- KATO: the feeder wiring and フィーダー (feeder) connect the パワーパック (power pack) to the track 45.
- TOMIX: the D.C.フィーダー (D.C. feeder) connects the controller to the track, and before powering up you check that the speed knob is at STOP and the direction switch is at the centre dot 53.
Why trains far away slow down
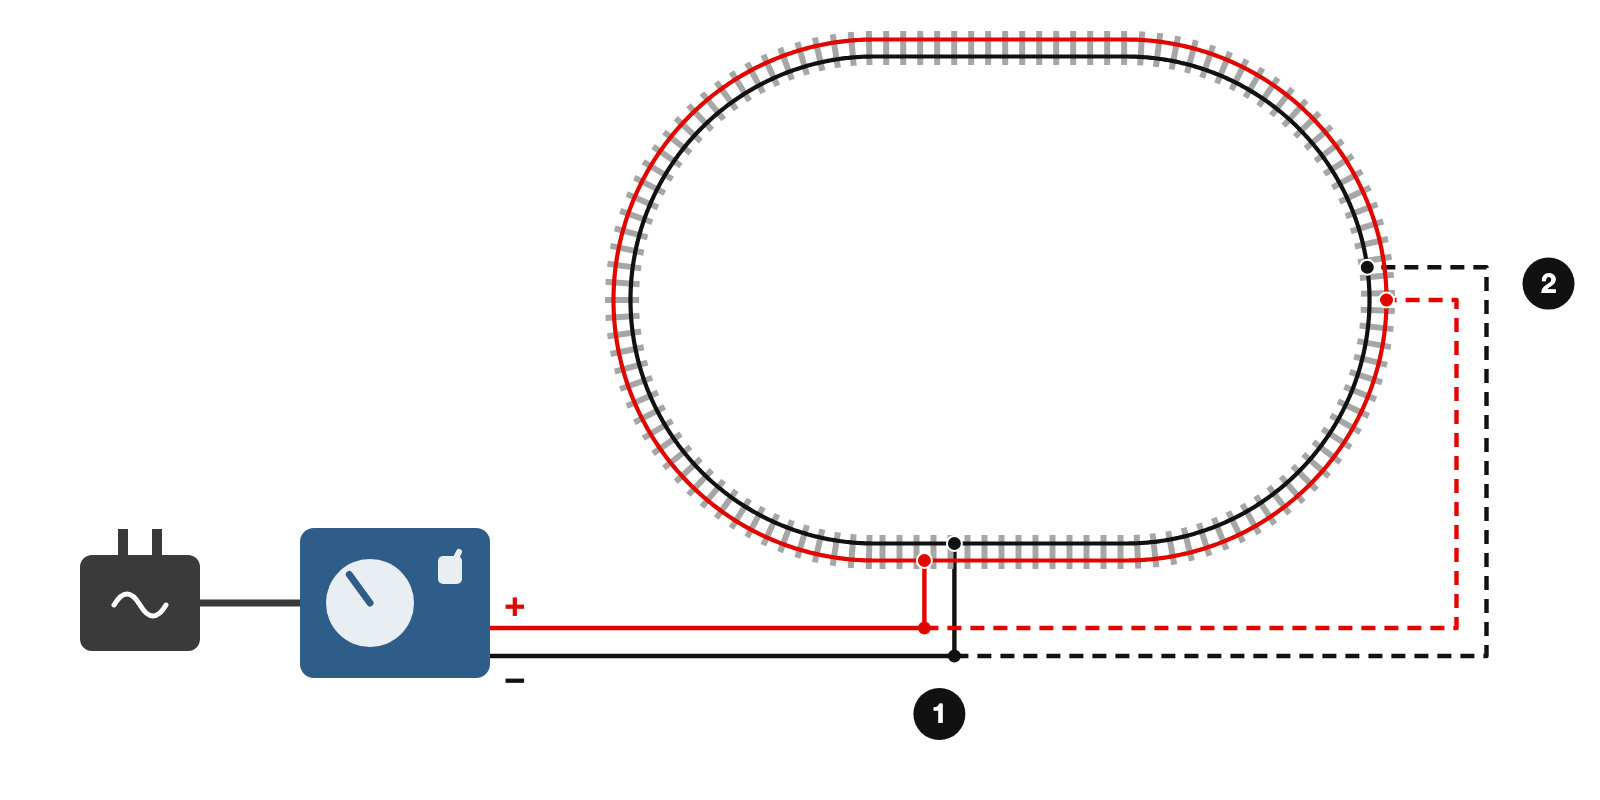
The NMRA says that on a simple one-train layout, two wires from the controller to the track may be enough, but a train slows as it gets farther from the power and speeds up as it comes near, because of voltage drop 5. Märklin's technical tip gives the same explanation: the farther a locomotive is from the feed point, the slower it goes, because every rail joint has a tiny resistance and they add up 17. The fix is to run a heavy bus wire alongside the track and take thinner feeder wires from it to the rails 5.
Each source gives a different spacing, so the table below cannot be merged into one number:
| System | Feeder spacing | Source |
|---|---|---|
| NMRA beginner's guide (two-rail, DCC) | Feeders 2 to 3 ft apart (about 0.6 to 0.9 m); one for every 3 ft of flex track | 5 |
| NMRA TN-9 (code 100 and finer rail) | One feeder per about 3 ft (about 1 m) of rail at most | 8 |
| Märklin technical tip 201 (three-rail, analog operation) | Feed again at every 2 to 3 m at the latest | 17 |
| Märklin technical tip 105 | No fixed rule; spacing can be larger when the joints are in good condition; feeding once before and once after a turnout makes sense | 18 |
The spacing differs by more than a factor of two. That is probably because the systems differ (three-rail roadbed track against two-rail sectional track), which is the editors' inference. Before drawing a wiring plan, read the manual for your own track.
On how to wire: the NMRA says it is best to solder the wire to the rail and does not recommend wires clipped onto rail joiners 5. TN-9 is more explicit: do not rely on a friction connection such as a rail joiner to carry power, but solder or use a screw terminal 8. Use stranded wire, which stands up to vibration better than solid wire 58. For gauge, the NMRA beginner's guide advises 14 AWG or heavier for a DCC bus and 18 AWG for feeders 5. TN-9 gives a minimum that varies with current, and for a 5 A system the feeders should be at least 20 AWG 8. Märklin's statements on wire gauge contradict one another, so they are not quoted here.
(Editor's advice) On a small layout, start with one pair of wires, and when a train slows somewhere after it is running, add a feeder at that spot. Do not start with a complicated wiring plan.
Reverse loops: take care on two-rail systems
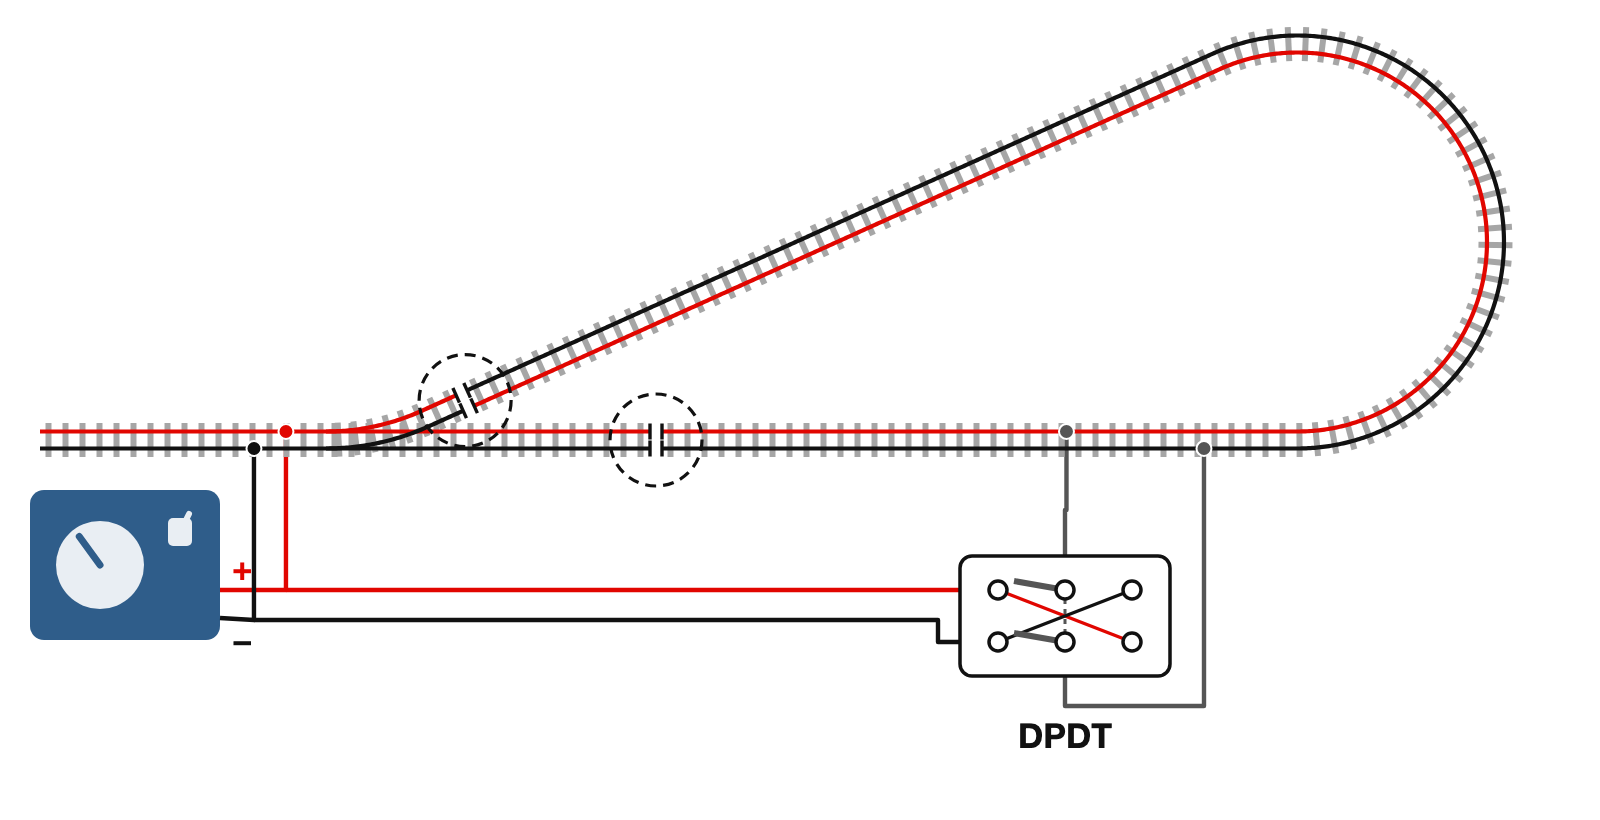
If a layout has a section that turns back so that a train comes round facing the other way (a reverse loop, Kehrschleife in German), then in two-rail DC or DCC systems the outer rails join up on the way round and cause a short circuit 35. The NMRA puts it similarly: it connects the two rails, one positive and one negative, with opposite polarity, causing a short that can damage the controller and locomotives 5.
The fix is to cut four insulating gaps, two at each end of the loop. Two are not enough, because a wheel set crossing the gap still shorts 35. After the gaps, polarity has to switch as the train enters the loop. By hand, use a double-pole double-throw (DPDT) switch, which works for DC and DCC. DCC also has special polarity reversers that detect a short and swap polarity automatically. A diode bridge works for DC only and does not work on DCC 35. In DCC the polarity of the track itself does not matter to the train. The trouble is that polarity differs on the two sides of a gap, so the moment a wheel crosses it there is a short, and the DCC supply cuts out 35.
Märklin's three-rail AC system does not have this problem: the two rails are connected and act as one pole, so any track shape can be laid 42. Märklin's official Gleisplanbuch has several plans with a reverse loop (Kehrschleife), which supports this 16, but the editors did not check page by page whether their parts lists include extra accessories.
A figure 8 is a different matter. A train that runs a full figure 8 returns facing the same way it set out, so by the editors' inference it does not need the polarity-switching circuit of a reverse loop, though the editors found no source that says so outright. How power is handled at the crossing in the middle of a figure 8 on two-rail systems depends on the crossing you choose, so follow its manual.
Before powering up, and after a short
Before the first power-up, Bachmann's instructions ask you to check that there is no metal on the track, not even metallic tinsel or Christmas-tree hooks. A derailed wheel can cause a short, so check that all wheels are on the rails and all connections are firm. The set has a circuit breaker that resets itself once the short is cleared 32.
A DCC maker's explainer lists common causes of shorts: a car running through a turnout from the frog end and bridging an electrical gap, or a wheel set that is out of gauge or derailed passing through a turnout 38. Another site adds that stray solder splashes can cause accidental connections 39. Splitting the layout into separately powered sections means a failure only affects one section and greatly narrows the search 3839. Check the simple things first, and only then decide whether to rewire 39.
How to lay out the first loop
Oval, figure 8, then turnouts
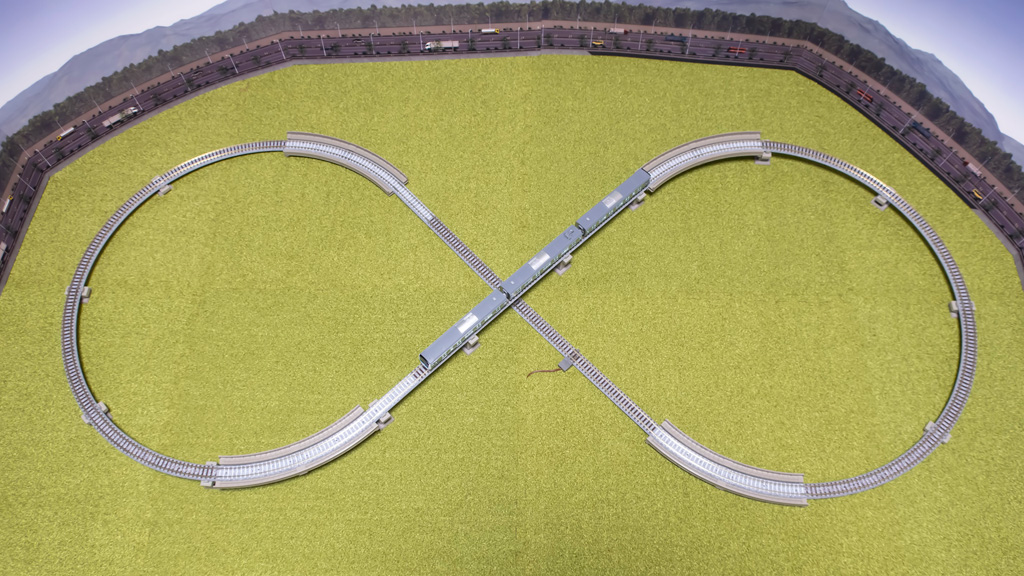
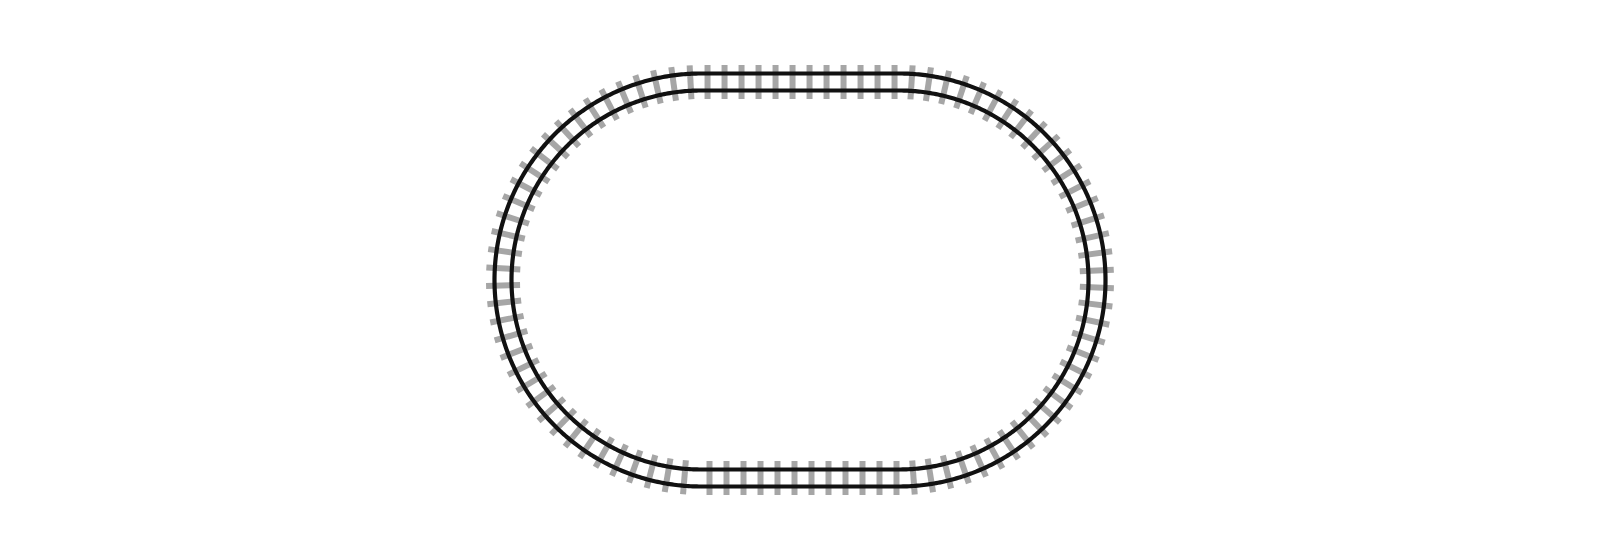
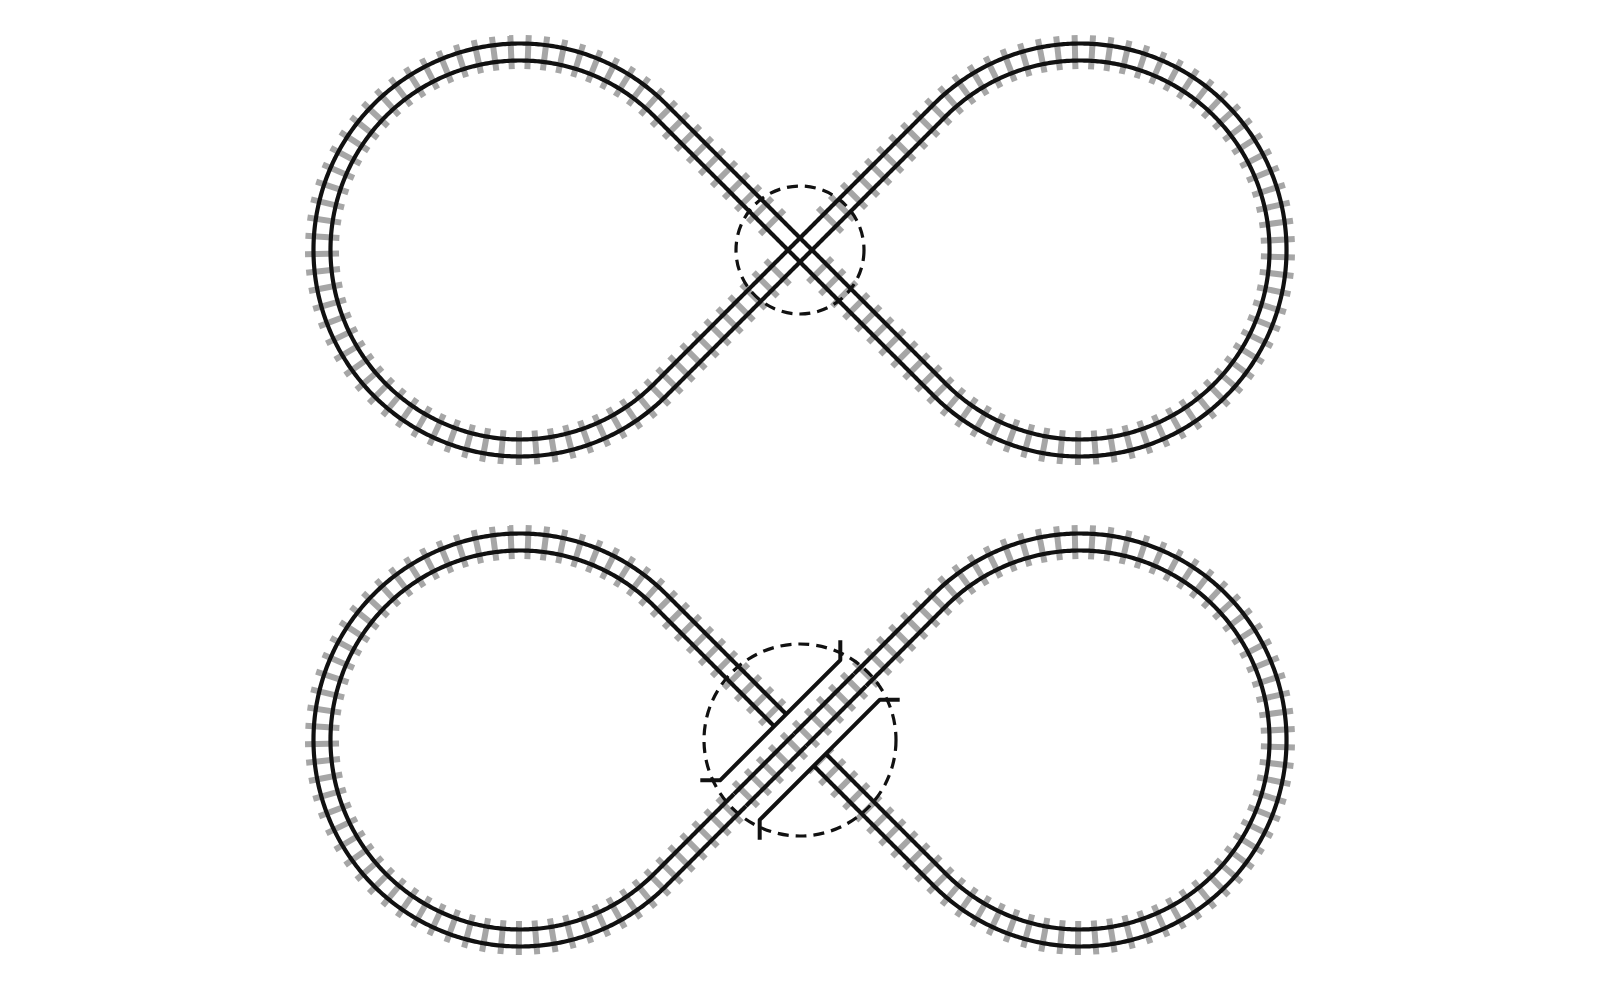
The oval is the most common starting layout and can run continuously 41. A figure 8 can use a flat crossing or a grade-separated one, and a grade-separated one has to consider gradient 41. Reverse loops and dog bones come later.
Several makers show their own order for adding things:
- NMRA: an oval, then a crossing to make a figure 8, then a turnout for a spur, then a passing siding 2.
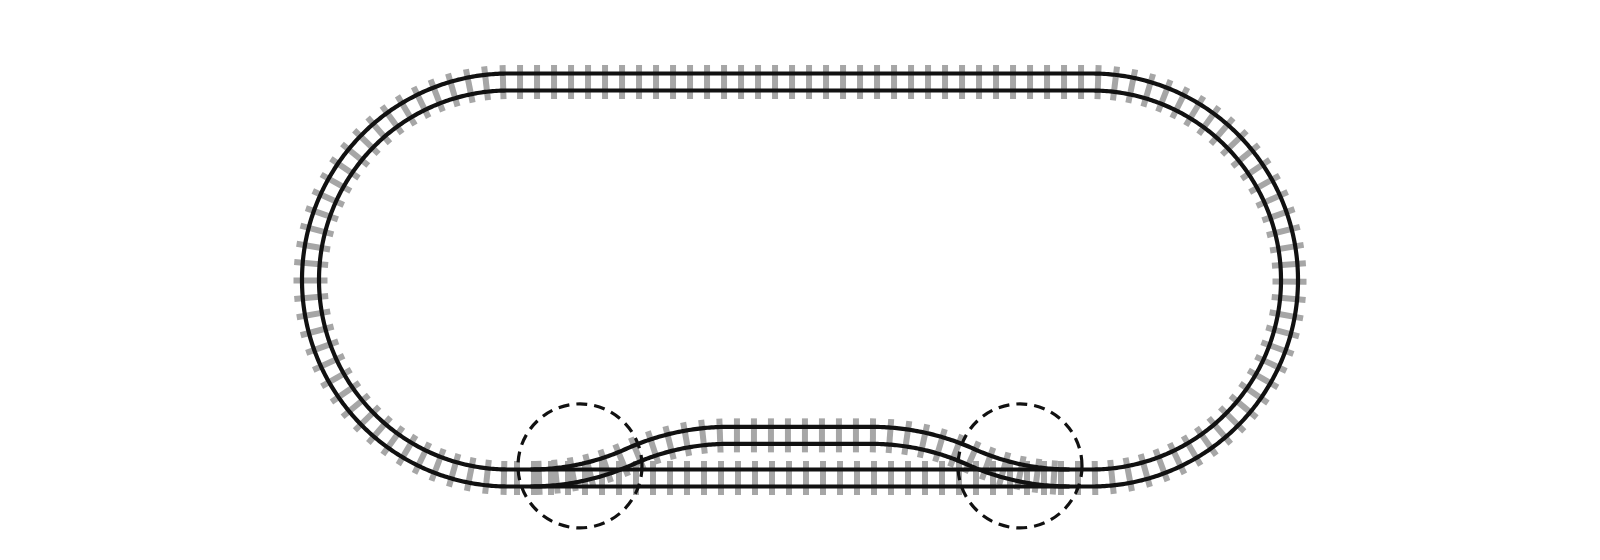
- Piko A-track: A (oval); B adds a turnout and a spur, which is already enough for shunting; C is the "station set" with two turnouts and can run 2 trains; E is a parallel-track set that makes a passing siding and is useful for longer trains 24. The footprint goes from 110 × 88 cm to 182 × 88 cm for A+B+C 24.
- Märklin: extension packs are the fastest way to expand, and turnouts and track can also be bought singly 12. The official C1 extension pack 24900 (which includes one turnout) is positioned as adding a storage siding to a C-track starter set 43.
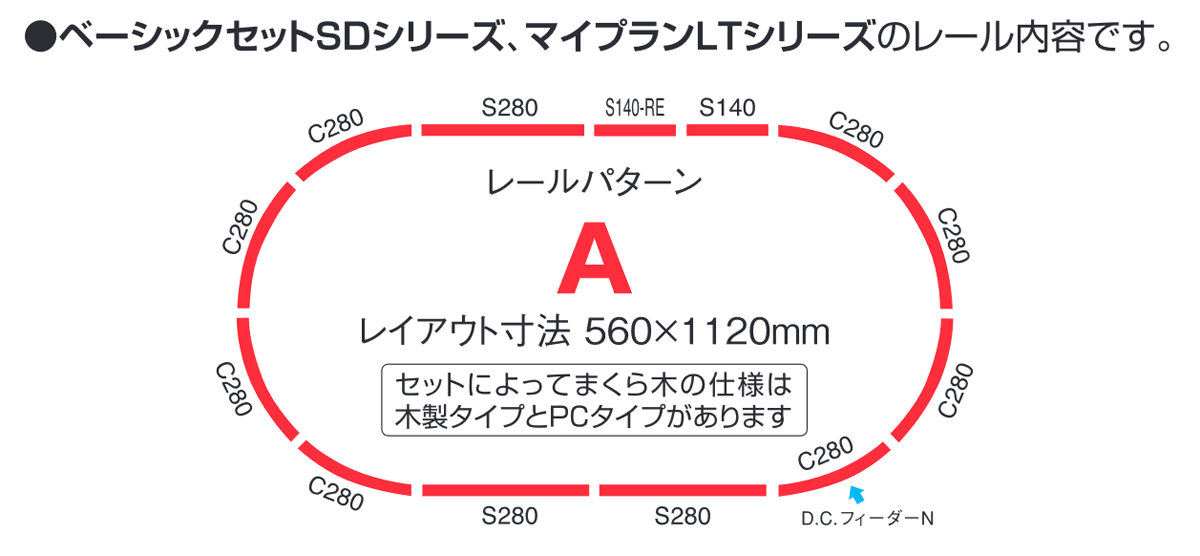
- TOMIX: Fine Track's basic pattern A is a 小判形 (oval), the basis of all other patterns. Expansion has three steps: add the same number of straights at the front and back to lengthen it; add turnouts for an inner branch; add a crossing for a figure 8; add curves on the outside for a double track 54.
- KATO: the M1 comes with a PlanVariationGuide and can be expanded with V-series track sets. The M2 is already a loop with a passing siding (待避線) 4544.
Passing sidings and spurs
A passing siding should be at least as long as the longest train you plan to run 2. A double-track main line takes a lot of room and makes the whole layout look smaller 2. For spurs and shunting areas, use straight track or wide arcs if you can, because coupling cars on a curve is harder 2.
Märklin's magazine describes a way to join two parallel straights: two identical turnouts, curved leg meeting curved leg, with each straight leg going into one of the two parallel lines 12.
Turnout number affects footprint too. A lower number takes less room, while a higher number suits main lines and gives longer trains fewer problems 2.
Test-lay first, then fix
In TOMIX's scenery workflow, step 4 is 「臨時敷設と通電テスト」 (temporary laying and power test): lay the track loosely, power it, check that trains do not hit the buildings, and check the structure gauge (the space a train needs to clear) 56. Märklin's magazine also says that once the C-track is laid, temporary wiring is enough for a first test run to see whether the track system works 15. Piko gives the same advice for tight curves: run first, fix after it works 24.
(Editor's advice) Lay the whole track loosely, connect power, run every locomotive for several laps, switch every turnout back and forth a few times, and only then fix it down.
Simple scenery
Order
Trains.com divides scenery into five main steps: the terrain base, plaster, roads and rocks, painting, ground cover and static grass, and finally ballast, water, details and trees 11. If you keep this order in mind, later work will not spoil work already finished 11.
The steps in practice:
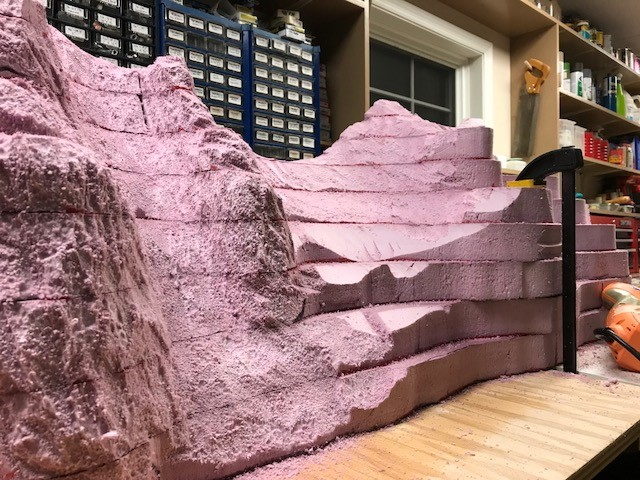
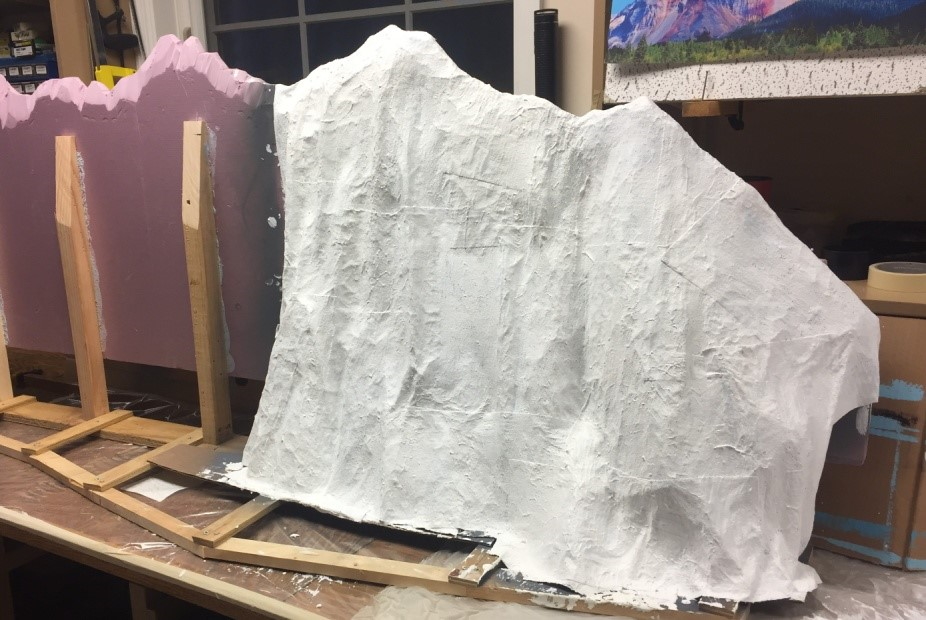
- Build the terrain base from foam board. The NMRA says pink or blue foam board 1 in or 2 in thick is fine, and not to use white foam, which crumbles into little beads 6. Trains.com says a self-supporting landform should be at least 1 in thick 11.
- Cover the surface with plaster cloth. Dip pieces of plaster gauze in water for 4 to 5 seconds, lay them over the frame with about 25% overlap, and wait several hours for them to set 6. If small holes remain, add a thin coat of Sculptamold to smooth them 11.
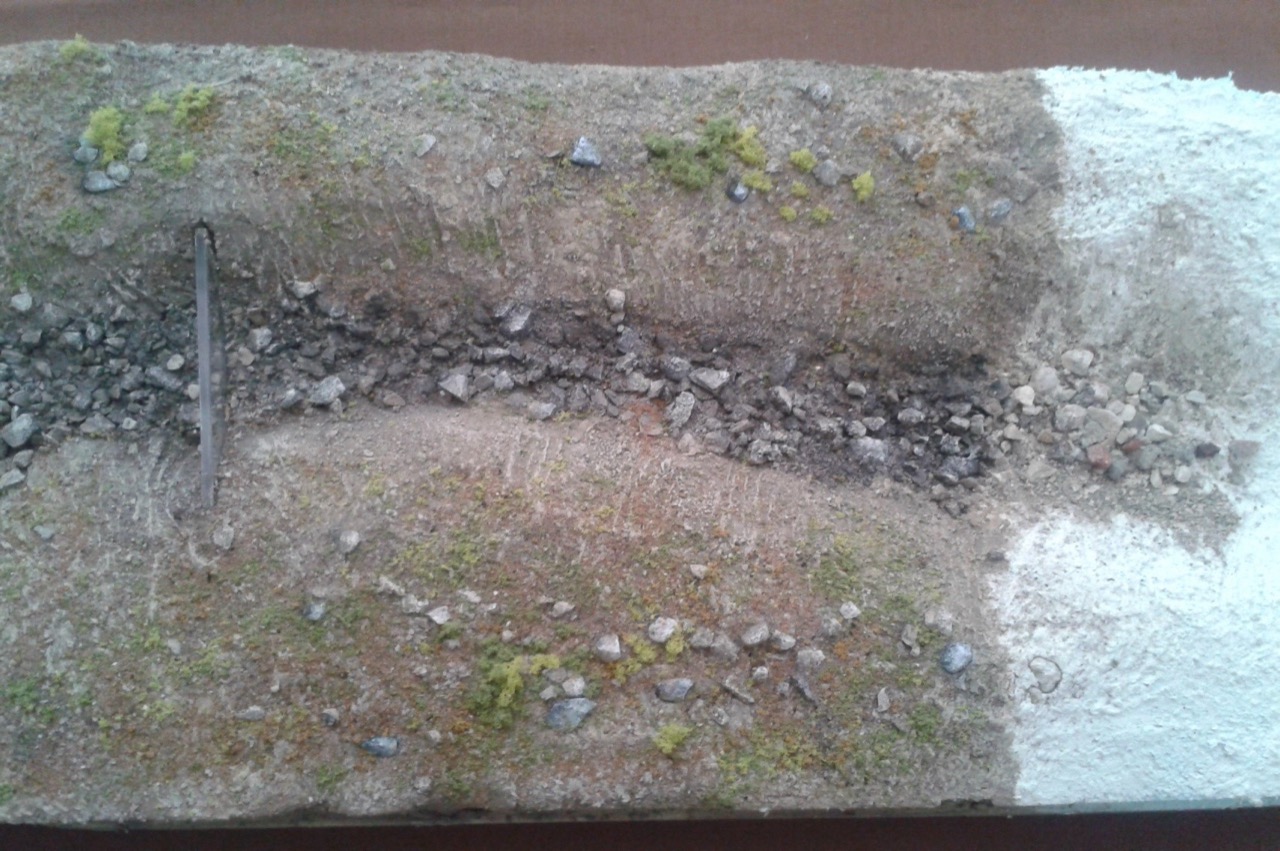
- Paint. First colour the track and roads, then do the rest of the ground, or you may damage what is finished 11. Brush flat interior latex paint on the plaster, using dark brown where grass will go so that gaps in the grass do not stand out 11.
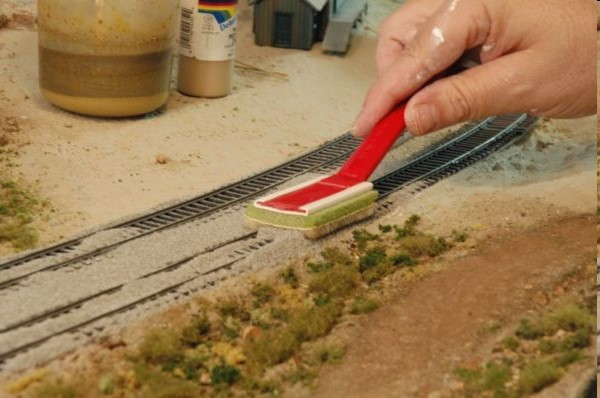
- Apply ground cover. Brush full-strength white glue on the area, no more than a square foot at a time, then sprinkle foam ground cover 11. After that, wet it with 70% isopropyl alcohol and drip on glue diluted 1:1 or ready-made Scenic Cement to fix it 11. Static grass has to be applied with an applicator while the glue is still wet, so that the fibres stand up 11.
- Ballast goes down last, after the surroundings are completely dry and never while they are wet 11. The wheel flanges run on the inside of the rail, and nothing may be there 6. Vacuum up the excess and wipe glue off the railhead with a damp cloth 6.
- Plant the trees last. On a foam base, punch holes with an awl a little narrower than the trunk, dip the foot of each trunk in white glue and push it in 11.
The NMRA's principle is to work from small to large: dirt, grass, big bushes, trees 6. Large rocks go in before the ground cover 6. Nothing in scenery cannot be done again if you get it wrong 6.
Test-run before plaster
This is the step people overlook most. The instruction sheet of Woodland Scenics' lightweight layout kit goes like this: put the track and bridge on and test-run first, then apply plaster cloth. After the plaster dries, put the track back, power it and test-run again, checking clearances and derailments. Only when trains pass smoothly do you trace the track, remove the train and fix the track down 36. The sheet also warns that if you run long trains you should leave clearance around tunnels, bridges and rock faces, and adjust as needed 36. When gluing track, use little glue, keep it off the rails, and above all keep it away from the turnout throw mechanism 36.
Track needs a bed under it. The NMRA says that laying track straight onto plywood makes trains noisy. Common roadbed materials are cork, foam and Homasote (a pressed paper board) 4. If the board is made of foam, you must use a foam-safe glue such as Liquid Nails for Projects 4. If you use track nails, do not drive them tight. Leave a small gap under the head so that the track can move slightly 4.
Gradients, clearance and access
The best first layout is flat. If you want a gradient, the NMRA says that anything over 2% clearly hurts locomotive performance and limits train length. The top and bottom need smooth transitions, and where one line crosses over another, you need enough clearance 2. Two Märklin sources both say not to exceed 3%, which is 3 cm of rise per metre, and only 2% on curves 1319, and only a very short branch line may go up to 5% 19. The ramp pieces in the Woodland Scenics kit are 4%, and the instructions say "no complicated calculations needed" 36. They are made for very short trains and very small layouts (editor's summary).
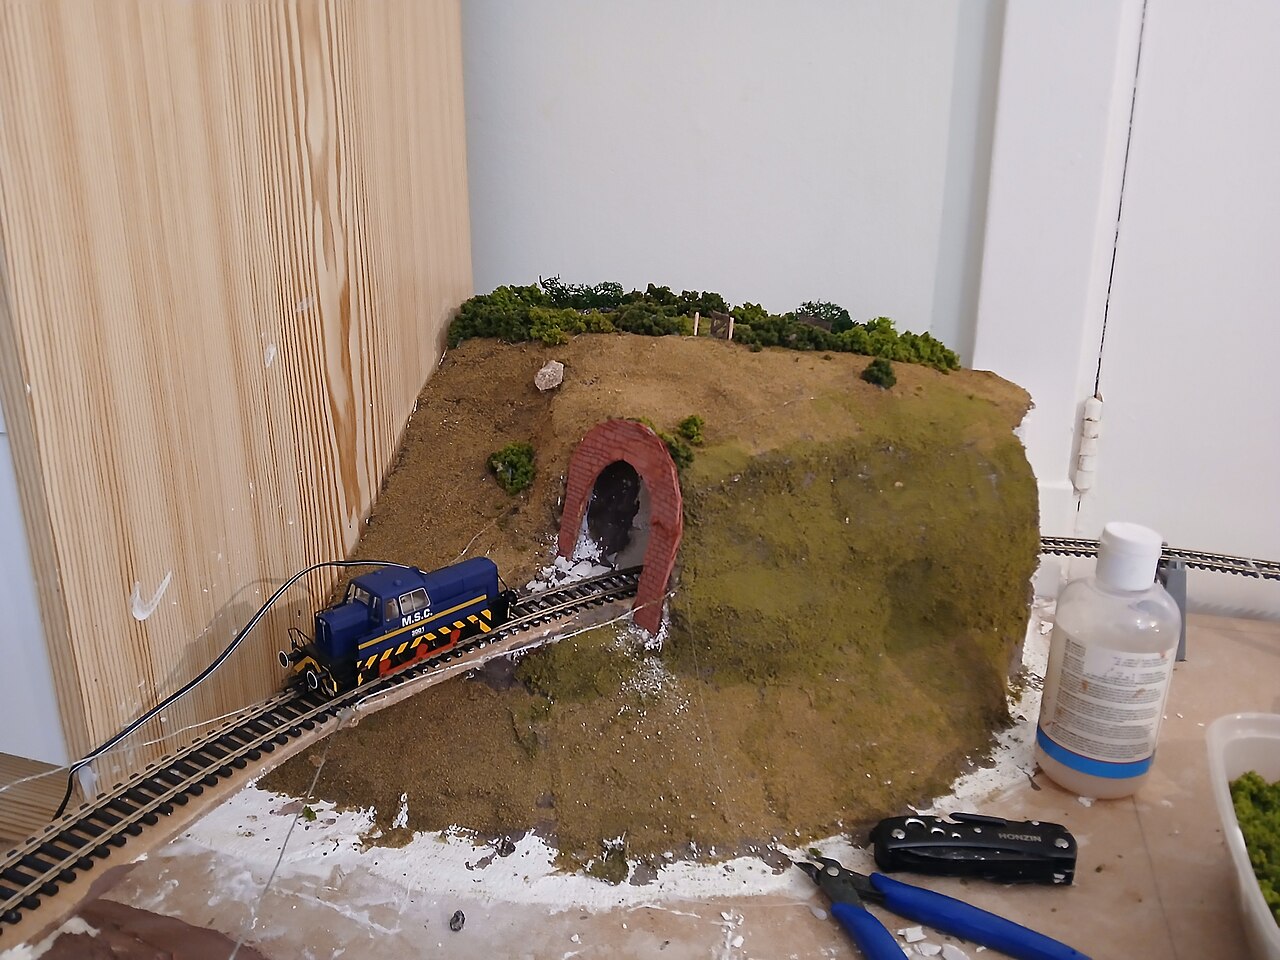
For clearance, Märklin's technical tip says that on a bridge that steam or diesel locomotives pass under, the distance from railhead to the underside of the bridge should be at least about 60 mm, with a clear height of about 75 mm. For electric locomotives with overhead wire it needs to be about 105 mm 19. To climb to 75 mm you need a ramp at least 2.5 m long, and 3 to 3.5 m once you allow for the easing at the ends and the thickness of the bridge 19. That means a crossing over another line is hard to build on a board 1 to 2 m long. Märklin's magazine gives an easy alternative: if you do not want a gradient, use a level crossing (Bahnübergang) instead of a bridge 13.
The NMRA reminds you that every part of a layout has to be within reach. For places you cannot reach, leave an access hole or make the scenery as a block that lifts out whole 2. Märklin's magazine also says to leave an access path to a turnout under a tunnel, so you can reach it in a fault without taking the tunnel apart 13. Woodland Scenics' way is to cut a 1 × 1 in finger hole in the middle of an access panel, so that you can lift it out 36.
The Japanese approach
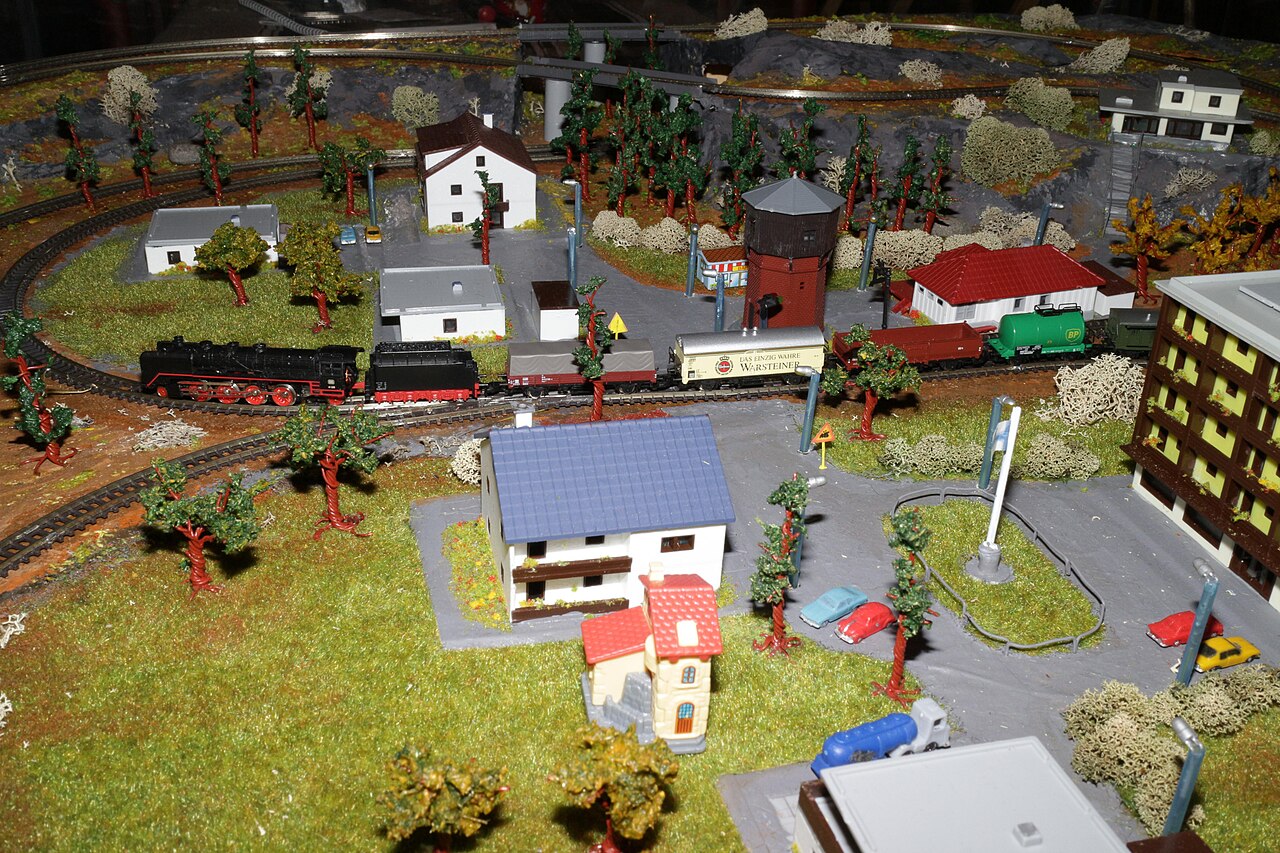
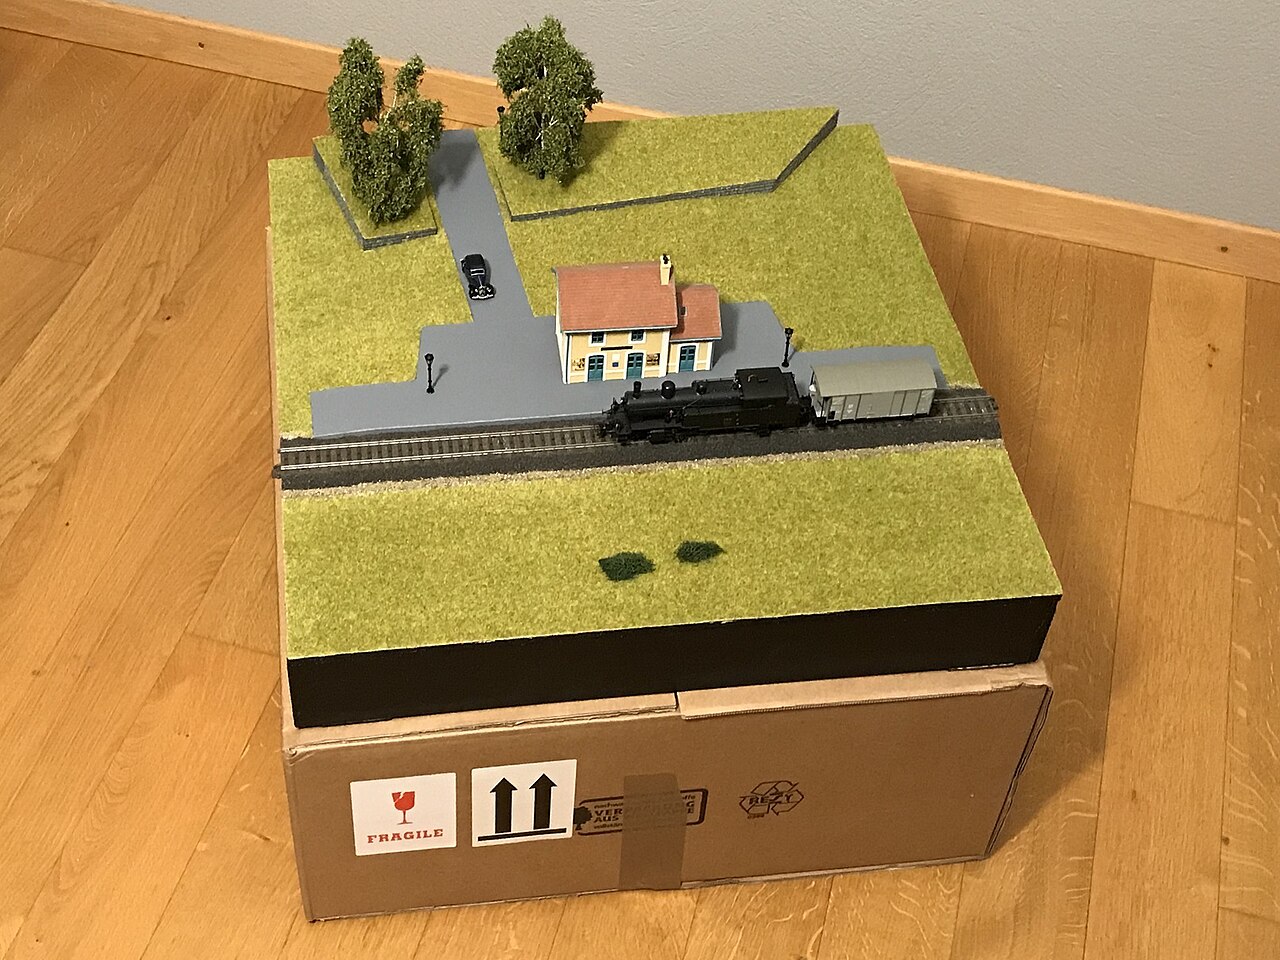
In Japan, "put a station and some buildings by the track" counts as the simplest scenery. TOMIX's site says that simply placing a station, platforms and houses beside the track already makes a scene, and that finished buildings and ジオコレ (Diocolle) pieces can be placed straight on 56. The official TOMIX process is: plan, prepare board and materials, place buildings loosely and trace their outlines, lay track temporarily and power test, fix the track and wire it, and finally add scenery 56. TOMIX's パノラママット (タウン) is a 900 × 1800 mm backdrop mat at ¥6,380 (tax included) that gives you a townscape when laid under patterns A+B+D, and the レイアウトベースキット is a one-piece moulded polystyrene mountain and river at ¥9,460 (tax included) 56. KATO's ジオラマくん (¥5,500) is a postcard-sized beginner diorama kit for people who have never made scenery, a small display piece and not a base for Unitrack 50. KATO's ミニジオラマベース is ¥2,310 per set, can be joined together, and can also connect to Unitrack through bridge piers 51.
(Editor's advice) For the first scene, make only three things: a level crossing, a house and a patch of grass. No gradient and no tunnel. Add more once the track runs reliably.
Budget tiers
The tier boundaries below are editor's advice. Prices are the list prices on official or retailer pages, with no currency conversion. Euro prices include 19% VAT and US dollar prices exclude sales tax 43.
| Tier | What it covers | Euro (Märklin, Piko) | US dollar (Bachmann) | Yen (KATO, TOMIX) |
|---|---|---|---|---|
| 1 Set only | A loop that runs | Piko myTrain €69.00; Piko with roadbed €99.99 to €134.99; Märklin Start up €129.99 25262243 | Thoroughbred 00691 $209.00 28 | TOMIX 90185 ¥25,300 55; KATO M1 ¥11,000 (train bought separately) 44 |
| 2 Set plus extension track and turnouts | A loop plus a passing siding | Märklin 29133 €129.99 plus C1 24900 €39.99, total €169.98; Piko 57154 €134.99 plus 2 A-track turnouts at €25.95 each, total €186.89 224326 | 00691 $209.00 plus #4 turnout $75.00, total $284.00; plus Steel Alloy Expander Set 44494 $120.00, total $404.00 2843 | KATO M2 ¥19,800 (motorised turnout included) 44 |
| 3 Add scenery materials and tools | Ground cover, glue, plaster cloth, track cutters and so on | Noch 60800 scenery starter set €43.49 62; Noch 07069 static grass starter €12.39 (excluding shipping) 63 | Scenic Cement 16 oz MSRP $9.99 58; Blended Turf T49 ground cover MSRP $7.77 59; SculptaMold 4 lb $18.49, plaster cloth 8 in × 5 yd $11.99 60; Xuron 2175M rail cutters MSRP $26.25 61 | TOMIX カラーパウダー ¥770 64, シーナリーボンド ¥550 65; KATO ジオラマ造形シート starter kit 24-500 ¥3,850 66; TOMIX パノラママット ¥6,380, レイアウトベースキット ¥9,460 56; KATO ミニジオラマベース ¥2,310 51 |
The totals in tier 2 are the list prices added together (editor's calculation). Tier 3 gives single-item prices and no total, because what people need to buy varies too much. A digital starter is counted separately: Märklin 29479 is €399.00 and already includes a pair of turnouts and a Mobile Station controller 23. Bachmann 44551, which is track and controller only, is $175.00 and has no train 2943.
Britain's Hornby Valley Drifter is £99.99 and is OO. The page shows a pre-order price, so it is not put in a tier 33.
Common pitfalls
- Laying an oval temporarily on a carpet and expecting it to run well. The NMRA says it usually does not 1.
- A rail sitting on top of a joiner, or a loose joint. The rails drift, derail and lose power 432.
- A curve tighter than the train's minimum radius. Märklin's and Piko's R1 sits at the lower limit for short trains, so long coaches and big locomotives may have trouble 1224. Check a train's minimum radius before buying 49.
- Feeding power at only one point, so trains far away slow down. Add feeders or run a bus 517.
- Building a reverse loop on a two-rail system with no gaps and no polarity circuit, so it shorts the moment a train enters 355.
- Metal on the track, or derailed wheels, causing a short. Turn the power off before you look 32. TOMIX's advice is to switch the power off at once after a derailment, because the motor heats up 53.
- A dirty railhead or dirty wheels. They cause poor contact, and the train will not move or will not run smoothly 5339. TOMIX suggests wiping with a cloth or cotton swab 53. Bachmann advises cleaning the track and the exposed locomotive wheels after every 8 hours of running, and not using steel wool 32.
- Plastering before test-running. If clearance is too tight or trains derail, you have to tear it out 36.
- Glue on the rails or on a turnout mechanism, or ballast where the wheel flanges run 366.
- Scenery that seals off the access hole, so you cannot reach a turnout inside a tunnel 213.
- A gradient that is too steep. The NMRA says anything over 2% clearly matters, and Märklin's limit is 3% 213.
- Drawing the plan too small. An idea on paper usually takes up more room in reality than you imagine 2.
- Mixing roadbed track from different makers. It mostly does not connect 4.
- Running for too long. TOMIX suggests resting the train after 30 minutes of continuous running, and not running at high speed for long 53.
Related terms
Sources
Numbers match the [n] markers in the text. All access dates are 2026-10-09, and prices are from the dates described in 43.
- NMRA Beginner's Guide, Part 1: Getting Started
- NMRA Beginner's Guide, Part 2: Layout Planning
- NMRA Beginner's Guide, Part 3: Building Benchwork
- NMRA Beginner's Guide, Part 4: Laying Track
- NMRA Beginner's Guide, Part 5: Adding Power
- NMRA Beginner's Guide, Part 6: Scenery
- NMRA RP-11 Curve Radius
- NMRA TN-9 Wiring for DC & DCC
- NEM 111 Minimale Radien (German original; the English PDF returned 404)
- Trains.com《Cutting up a 4×8 table》
- Trains.com《5 layout scenery steps to get you started》
- Märklin Magazin 02/2019, "Vom Startset zur Komplettanlage", part 2
- Märklin Magazin 03/2019, "Vom Startset zur Komplettanlage", part 3
- Märklin Magazin 2013/03, "H0-Anlage", part 1
- Märklin Magazin 2014/04, "H0-Anlage", part 8
- Märklin Gleisplanbuch (2022, 25 C-track plans)
- Märklin Technik-Tipp 201 (analog operation)
- Märklin Technik-Tipp 105(Ring-/Sternleitung)
- Märklin Technik-Tipp 412 Auffahrten/Brücken
- Märklin 24611 turnout, official page
- Märklin 24088 feeder track, official page
- Märklin 29133 Start up, official page
- Märklin 29479, official page
- PIKO A-Gleis manual (German; PDF hosted by a third party)
- Piko myTrain 57090, product page
- Piko 57154 BR 218 set with roadbed track, product page
- Roco 5100017 (Härtle, retailer)
- Bachmann Thoroughbred 00691, product page
- Bachmann 44551 NS E-Z Track Oval with Speed Controller
- Bachmann 18 in radius curved track, product page
- Bachmann 22 in radius curved track, product page
- Bachmann E-Z Track general assembly instructions
- Hornby R1270M Valley Drifter, product page
- Atlas HO True-Track Starter Set #0488
- Heathcote Electronics「Reverse loops」
- Woodland Scenics ST1483 instructions
- Wiring for DCC「Peco switches」
- Tony's Trains「DCC primer: track protecting against short circuits」
- Building-your-model-railroad「Troubleshooting」
- Innovative Hobby Supply blog, "Starter train set vs individual purchases"
- Model Railroad Academy「Planning and build」
- de.wikipedia「Modelleisenbahngleissysteme der Spur H0」
- Hobbee catalogue records (model-trains/catalog/catalog.sqlite) with their official product pages: https://www.marklin.com/products/details/article/24900; https://www.piko-shop.de/de/artikel/weiche-mit-bettung,-links-wl-27897.html; https://shop.bachmanntrains.com/index.php?main_page=product_info&cPath=258_366_367&products_id=2480; https://shop.bachmanntrains.com/index.php?main_page=product_info&cPath=258_366_369&products_id=2536
- KATO Unitrack track set line-up
- KATO M1/M2, product page
- KATO Unitrack curved track
- KATO FAQ「ポイントの接続」
- KATO Unitrack plan_j
- KATO Unitrack plan_CPT01(Compact)
- KATO ジオラマくん
- KATO ミニジオラマベース
- TOMIX Fine Track, introduction
- TOMIX beginner's page
- TOMIX track pattern expansion page
- TOMIX 90185, product page
- TOMIX layout-building page
- Trains.com「5 easy track plans」
- Midwest Model Railroad: Woodland Scenics S191 Scenic Cement
- Midwest Model Railroad: Woodland Scenics T49 Blended Turf
- Scenic Express: SculptaMold 4 lb and plaster cloth 8 in x 5 yd
- Tony's Trains: Xuron 2175M Vertical Track Cutter
- Noch 60800 Landschaftsbau Start-Set, official site
- besserepreise.com: Noch 07069 Start-Set Begrasung
- TOMIX カラーパウダー 8107
- TOMIX シーナリーボンド 8100
- KATO ジオラマ造形シート スターターキット 24-500(diorama_terrain 页)
Updated 2026-10-09
Found what you're after?
Tell us the exact listing and we'll quote it — no price comparisons here, just sourcing.
You get a quote first; you only pay after you confirm it.